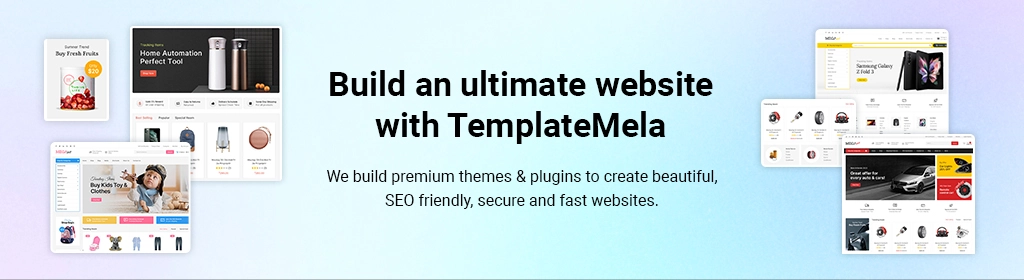
Welcome to TemplateMela
Congratulations on your purchase of an OpenCart template! This documentation consists of several parts and describes the installation, configuration and setting up an OpenCart website process.
We did our best to make this manual information to be presentedin a simple way. As an effective reference, the documentation below will provides all information you need, it has been restructured in different chapters, you can see in the left-side menu. You are able to navigate to any part of the documentation using the active content headers' links.
We recommend that you should start reading the documentation at the first section.
What is OpenCart?
OpenCart — is an Open Source e-commerce application. OpenCart provides easy customization of your online store. OpenCart community includes a number of users starting from the experienced web developers looking for the user-friendly interface, ending with shopkeepers that start their online business for the first time. OpenCart provides a great amount of features that allow you to control your store. Using OpenCart tools you can easily uncover the store potential.
Document OpencartHow To Get Support
- If you choose to not extend your support, you will still be able to submit bug reports via email or item comments and still have access to our online documentation, knowledge base and video tutorials.
- We are not able to provide support for code customizations or third-party plugins.
System Requirements
System Requirements for Opencart:
Click hereInstallation
→ Installation Folder Directories
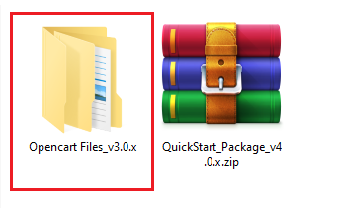
- For Quickstart Installation
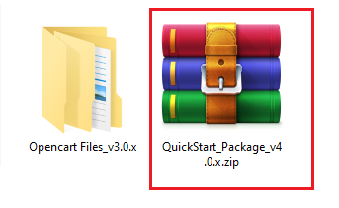
- For Manual Installation
1 : Quickstart Installation
- Please, read the whole section, before attempting to install the theme.
- WE RECOMMEND TO ALWAYS BACKUP YOUR SYSTEM BEFORE MAKING ANY UPGRADES OR CHANGES!
- Theme Quickstart installation video
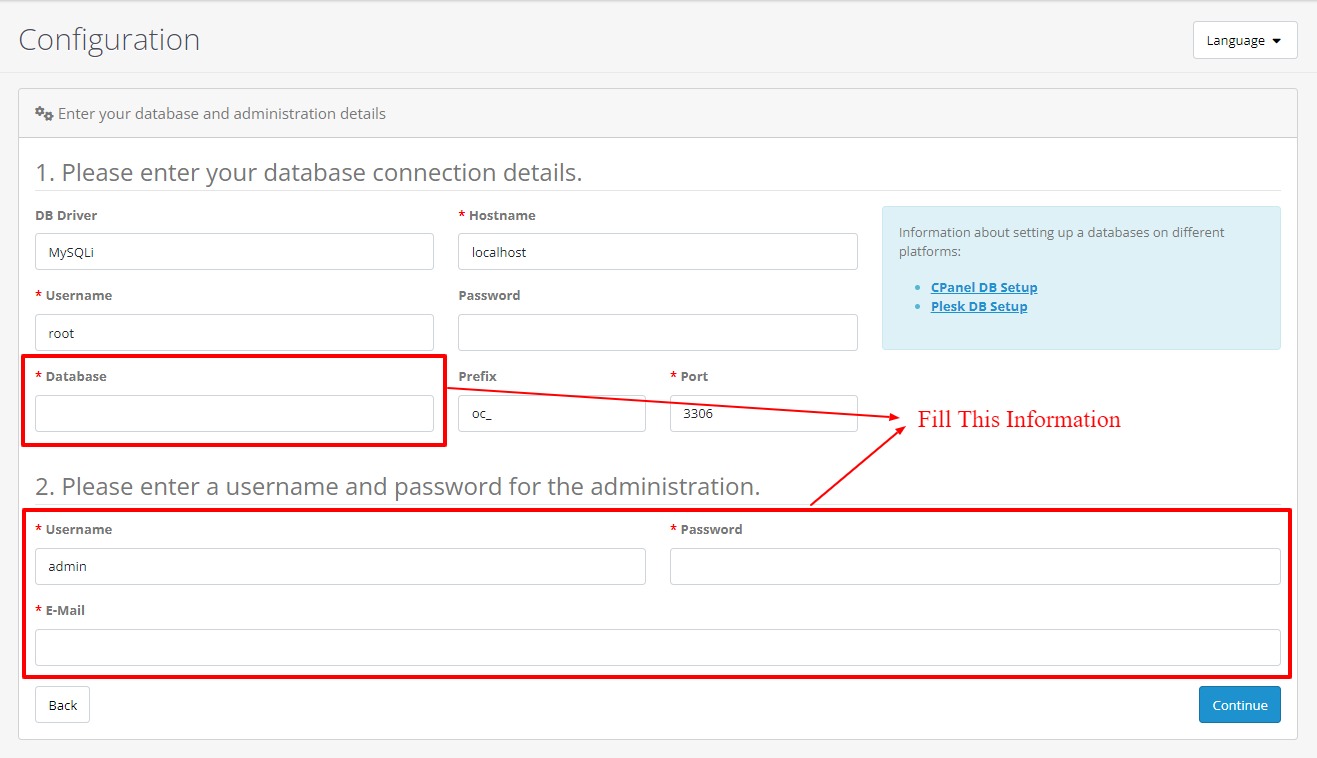
Step 1 : Create Database Back to Top
- You have to create a database in your hosting provider's control panel
Step 2 : Installation Back to Top
- Follow below 4 step's to install Opencart Theme
2.1 : Accept License
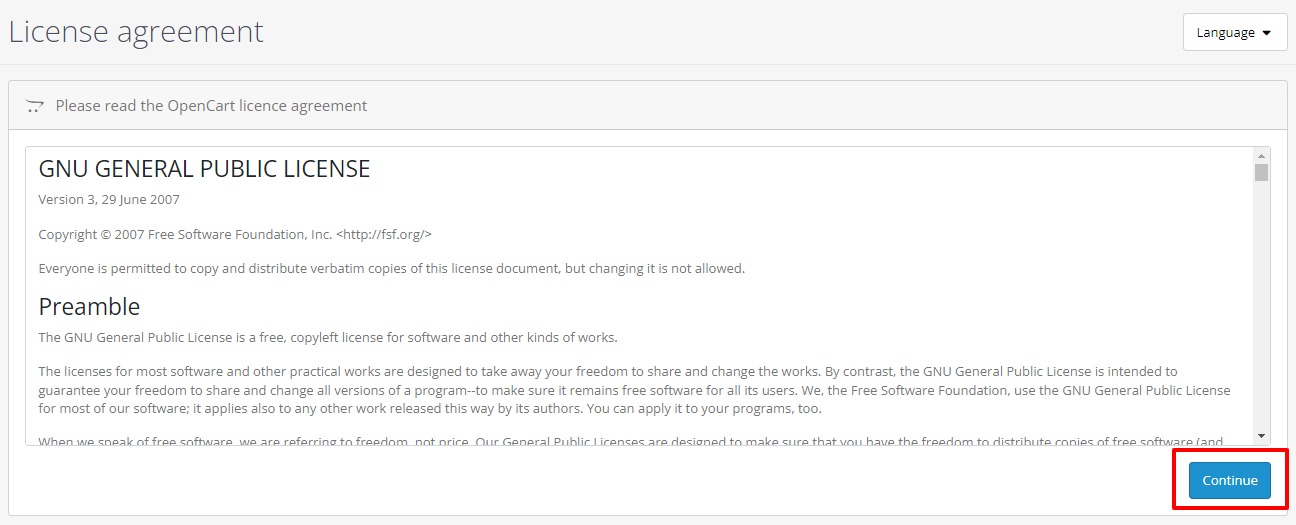
2.2 : Pre-Installation

2.3 : Configuration
2.4 : Finished

2 : Manual installation
Step 1 : Installation and Image Size Settings Back to Top
- Please, read the whole section, before attempting to install the theme.
- IT IS RECOMMEND TO ALWAYS BACKUP YOUR SYSTEM BEFORE MAKING ANY UPGRADES OR CHANGES!
Step-1 : Install Modules
- Copy the directories from “Opencart Files” (provided in to ZIP file) to your opencart root. Copy those directories at your opencart root respectively,
- e.g Your copy path will be
- ”avanam_extensions.ocmod” (install module)
- ”templatemela_theme_avanam.ocmod” (install module)
- ”arabic.ocmod” (install arabic language module)
- ”image” (Overwrite this folder)

Step-2 :Now let's activate the theme
- Under Admin Panel > Extensions > Extensions,
- Select Themes from Dropdown as shown below,
- Now click on Edit button of Your Store.
- Select “Templatemela Theme” into Theme Directory field.

- Status Enabled.
Step-3 : Now let's activate the language
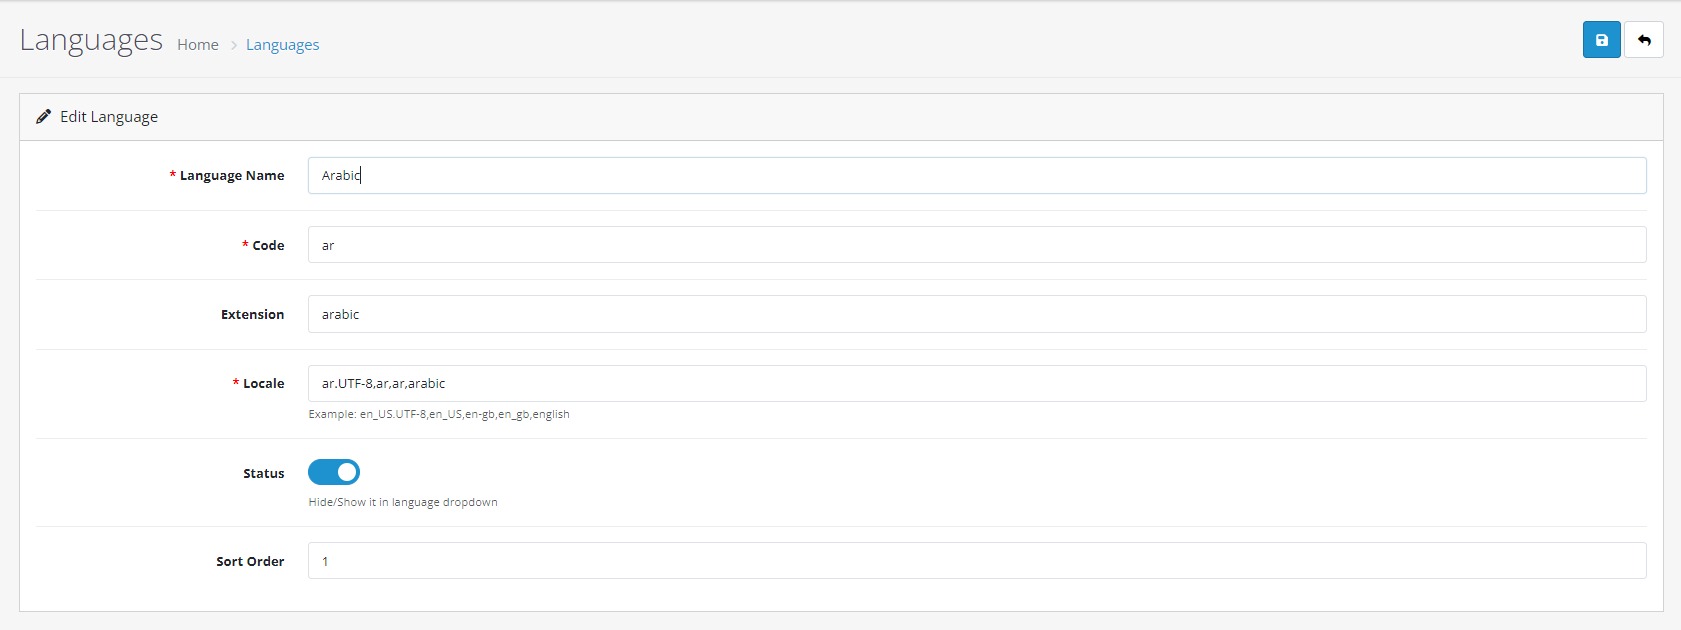
- To Enable Languages login to your admin panel and do follwing settings.
- For Example To add Arabic Language :
- Under Admin Panel > Extensions > Extensions,
- Select Languages from Dropdown as shown below,
- Now click on Edit button of Arabic Language.
- Select “Arabic Language” into Language.

- Status Enabled.

- Then Go to System > Localisation > Languages.
- Click on “Arabic Language's” Edit button to add new Language.
- Language Name : Arabic
- Code : ar
- Extention : arabic
- Locale : ar.UTF-8,ar,ar,arabic
- Status : Enable,
- Sort Order : as you like.
- Click on “Save” button.
Same way you can do the settings for other Languages.
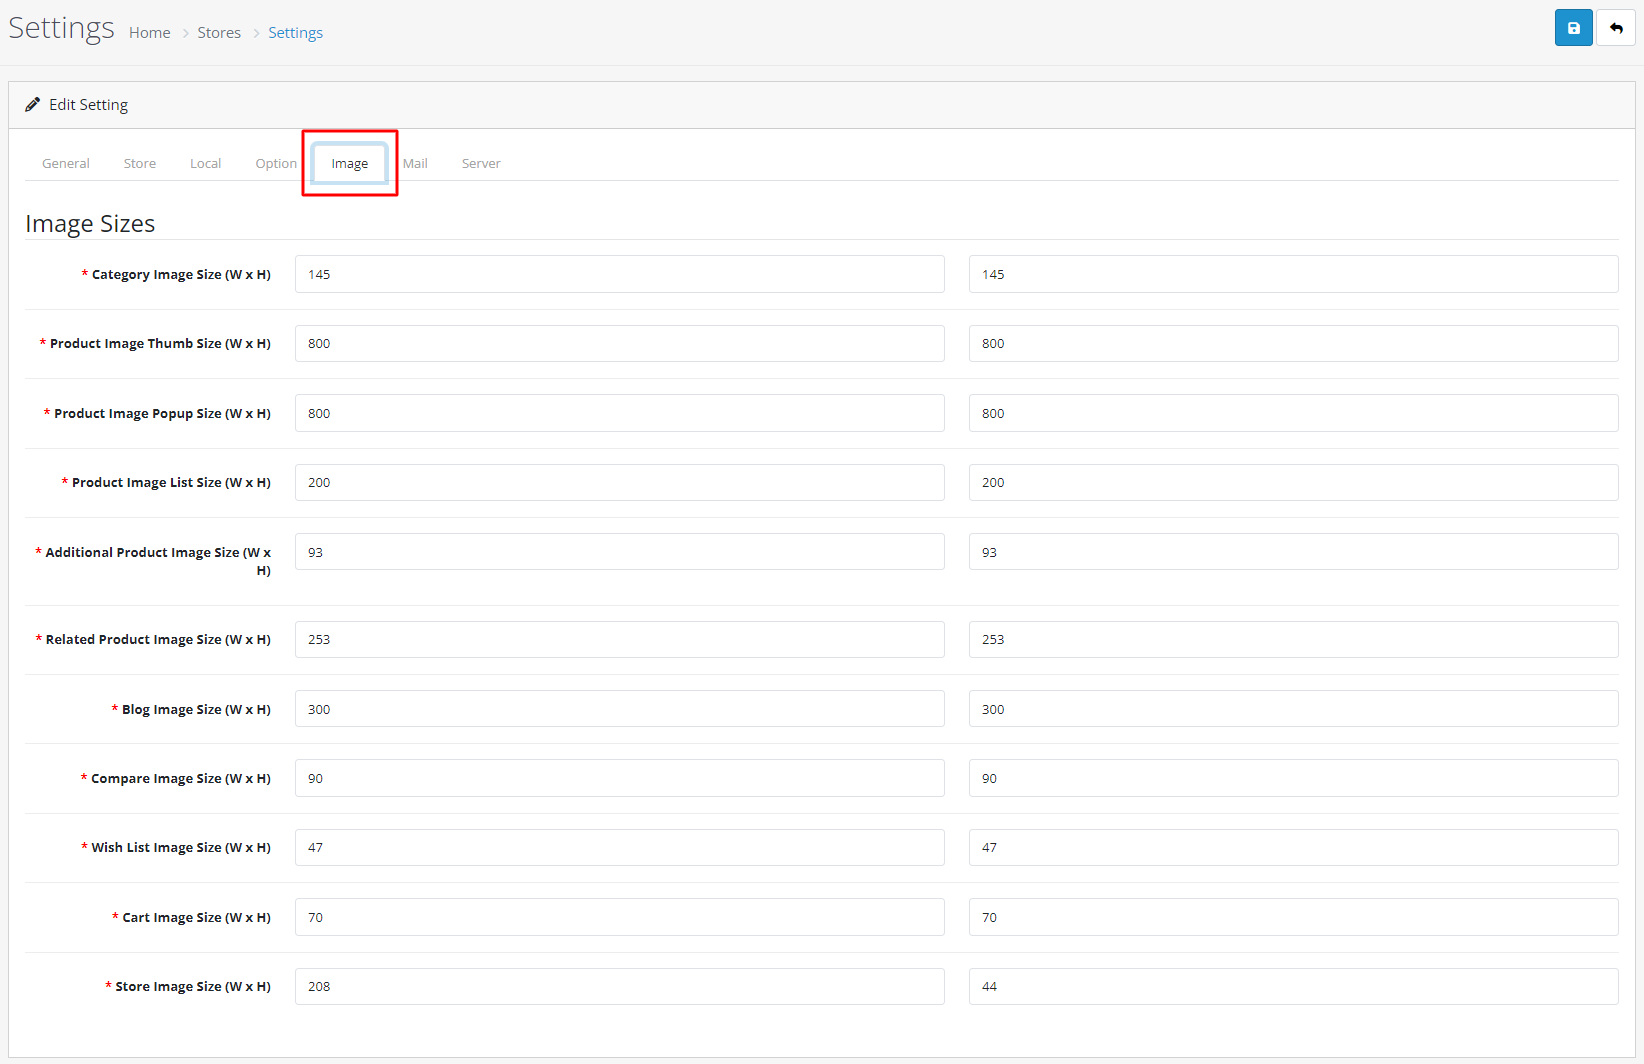
Step-4 : Theme Image Size Setting
- For Image Size , Go to System > Setting > Edit Image
- Here , You can change the image size of your theme
- Change Category Image Size to : 145 X 145
- Change Product Image Thumb Size to : 600 X 600
- Change Product Image Popup Size to : 800 X 800
- Change Product Image List Size to : 200 X 200
- Change Additional Product Image Size to : 93 X 93
- Change Related Product Image Size to : 253 X 253
- Change Blog Image Size to : 300 X 300
- Change Compare Image Size to : 90 X 90
- Change Wishlist Image Size to : 47 X 47
- Change Cart Image Size to : 70 X 70
- Store Image Size to : 208 X 43
- Click on “Save” button.
Step-5 : Banner Settings
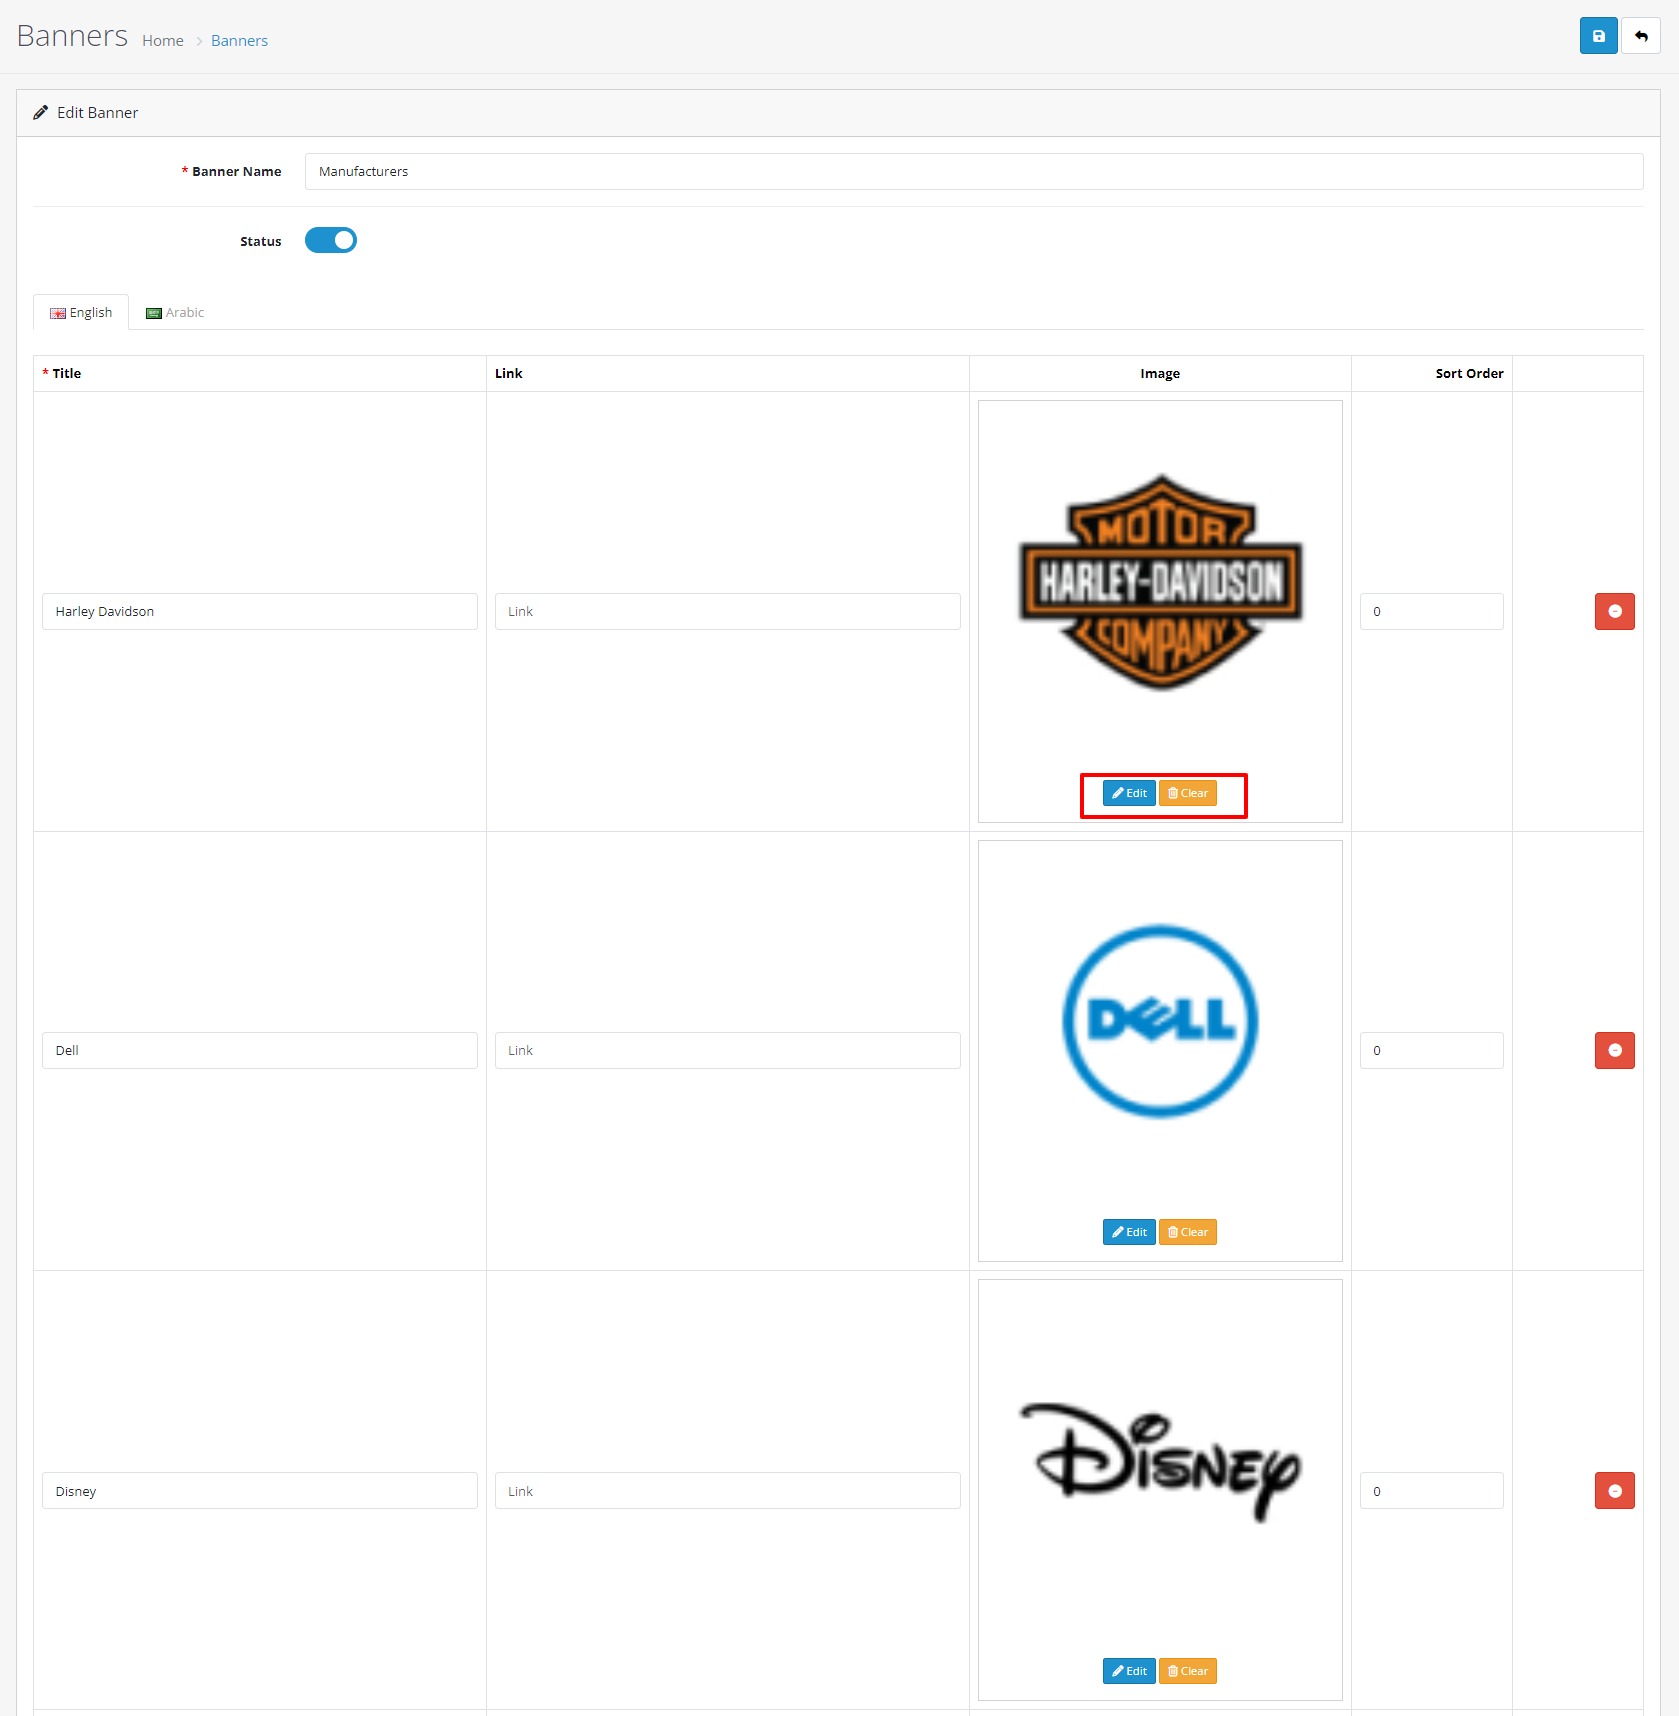
5.1 : Manufacturer Banner
- For adding Carousel banners go to Design > Banners.
- Click on “Add New” button to add new banner.
- Give Banner Name: Manufacturers
- From status select Enabled
- and click on “Add Banner” button.
- Give title of your banner and click on image to upload your banner.
- Now click on “Save” button.
- Now to activate your Manufacturer Banner Go to Extensions > Extensions. Select Modules from Dropdown.
- Now select Base Manufacturer, then click on Edit link
- Give Limit: as you like.
- Give Width & Height (168 X 74) (your banner Width and Height)
- From Slider select Enabled
- From status select Enabled
- Now click on “Save” button.

Step-6 : HTML Content
- Go to Extensions > Extensions. Select Modules from Dropdown.
- Now select HTML Content, then click on Install (After install click on "Edit" link)
1 : For Base Cms Banner Block
- Again Click on Add Module to add cms block.
- Give Module Name: Base Cms Banner Block
- Now click on Code View button in text editor block ,copy and paste this code, After this again
click on Code View button to save your HTML content. From status select Enabled.
- Now click on “Save” button.
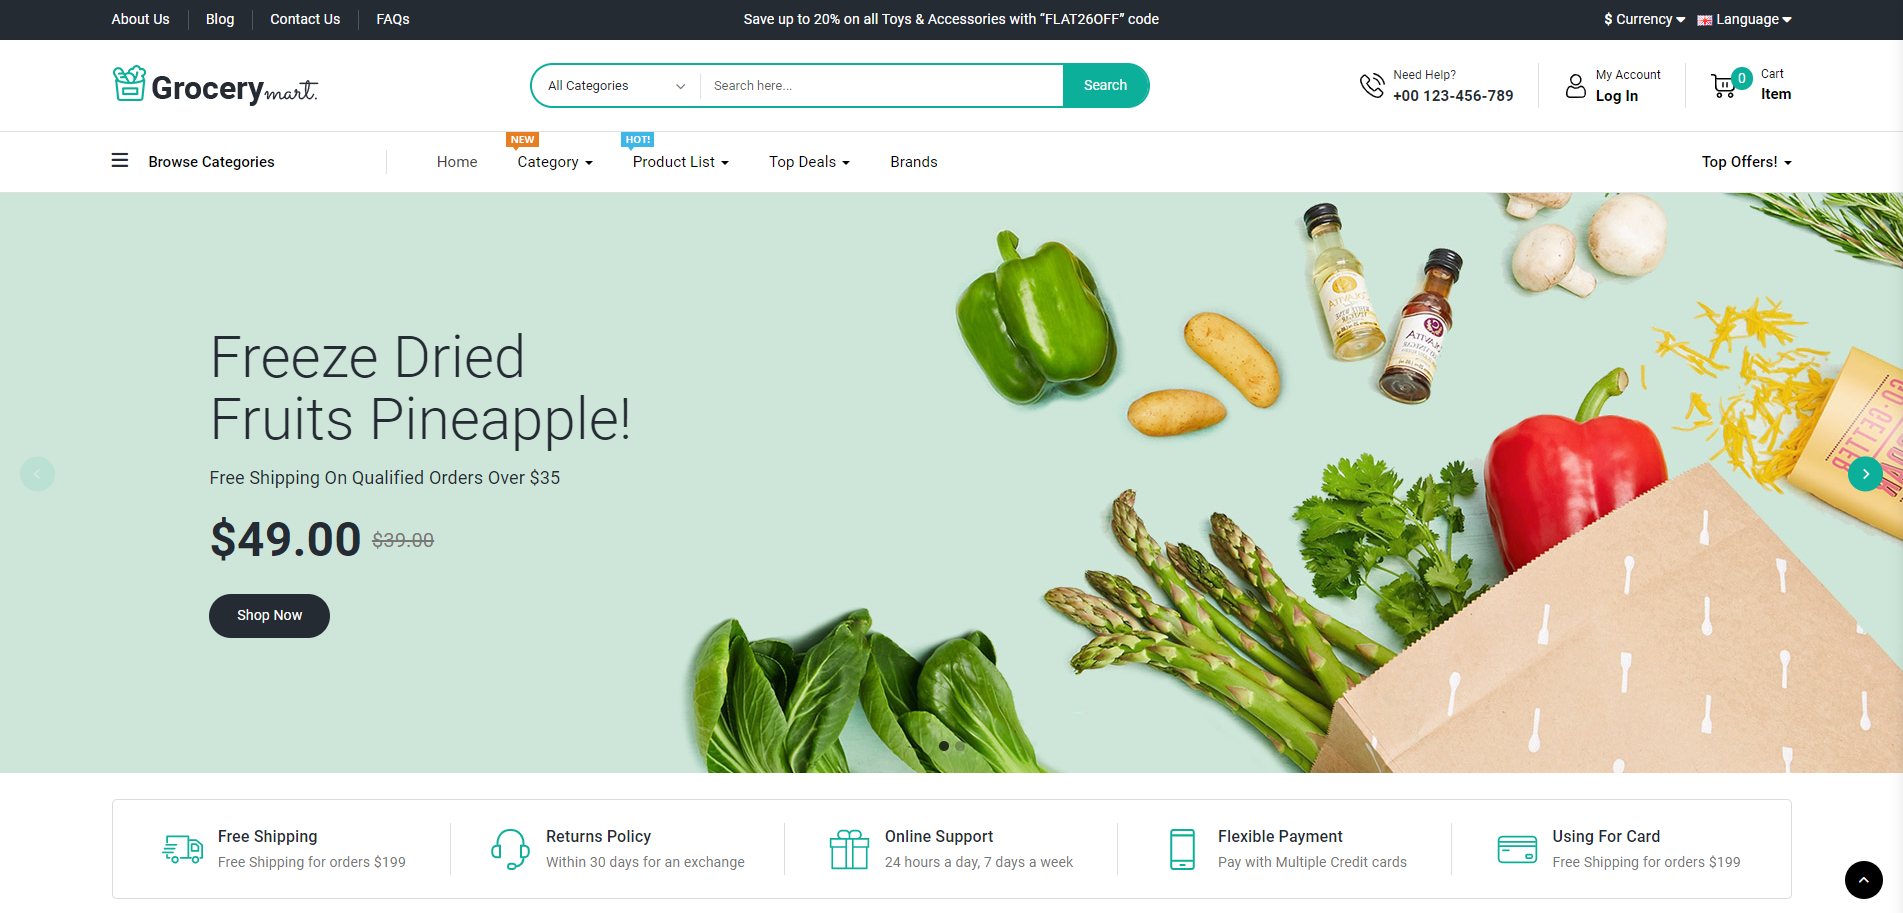
 offer
offer
Protein cookies
Extra 15% Discount

High Quality Food
Breads & Chips
Discount - 35%
$99.00
 New
New
500g Coffee mate
with Flavours!
Weekend Sale!
30%

offer
Protein cookies
Extra 15% Discount
High Quality Food
Breads & Chips
Discount - 35%
$99.00
New
500g Coffee mate
with Flavours!
Weekend Sale!
30%
2 : For Base Cms Banner Block 02
- Again Click on Add Module to add cms block.
- Give Module Name: Base Cms Banner Block 02
- Now click on Code View button in text editor block ,copy and paste this code, After this again
click on Code View button to save your HTML content. From status select Enabled.
- Now click on “Save” button.
 New
New
100% Fresh & Organic
Fruits, Vegetables
limited offer
$29.00
 sale
sale
Choco & Biscuit
Milk chocolates bar
Weekend Sale!
5%

                            New

                            100% Fresh & Organic

                            Fruits, Vegetables
                            limited offer

                            $29.00


                            sale

                            Choco & Biscuit

                            Milk chocolates bar
                            Weekend Sale!

                            5%
3 : For Base Cms Service Block
- Again Click on Add Module to add cms block.
- Give Module Name: Base Cms Service Block
- Now click on Code View button in text editor block ,copy and paste this code, After this again
click on Code View button to save your HTML content. From status select Enabled.
- Now click on “Save” button.

                            Free Shipping

                            Free Shipping for orders $199


                            Returns Policy

                            Within 30 days for an exchange


                            Online Support

                            24 hours a day, 7 days a week


                            Flexible Payment

                            Pay with Multiple Credit cards


                            Using For Card

                            Free Shipping for orders $199

Free Shipping
Free Shipping for orders $199
Returns Policy
Within 30 days for an exchange
Online Support
24 hours a day, 7 days a week
Flexible Payment
Pay with Multiple Credit cards
Using For Card
Free Shipping for orders $199
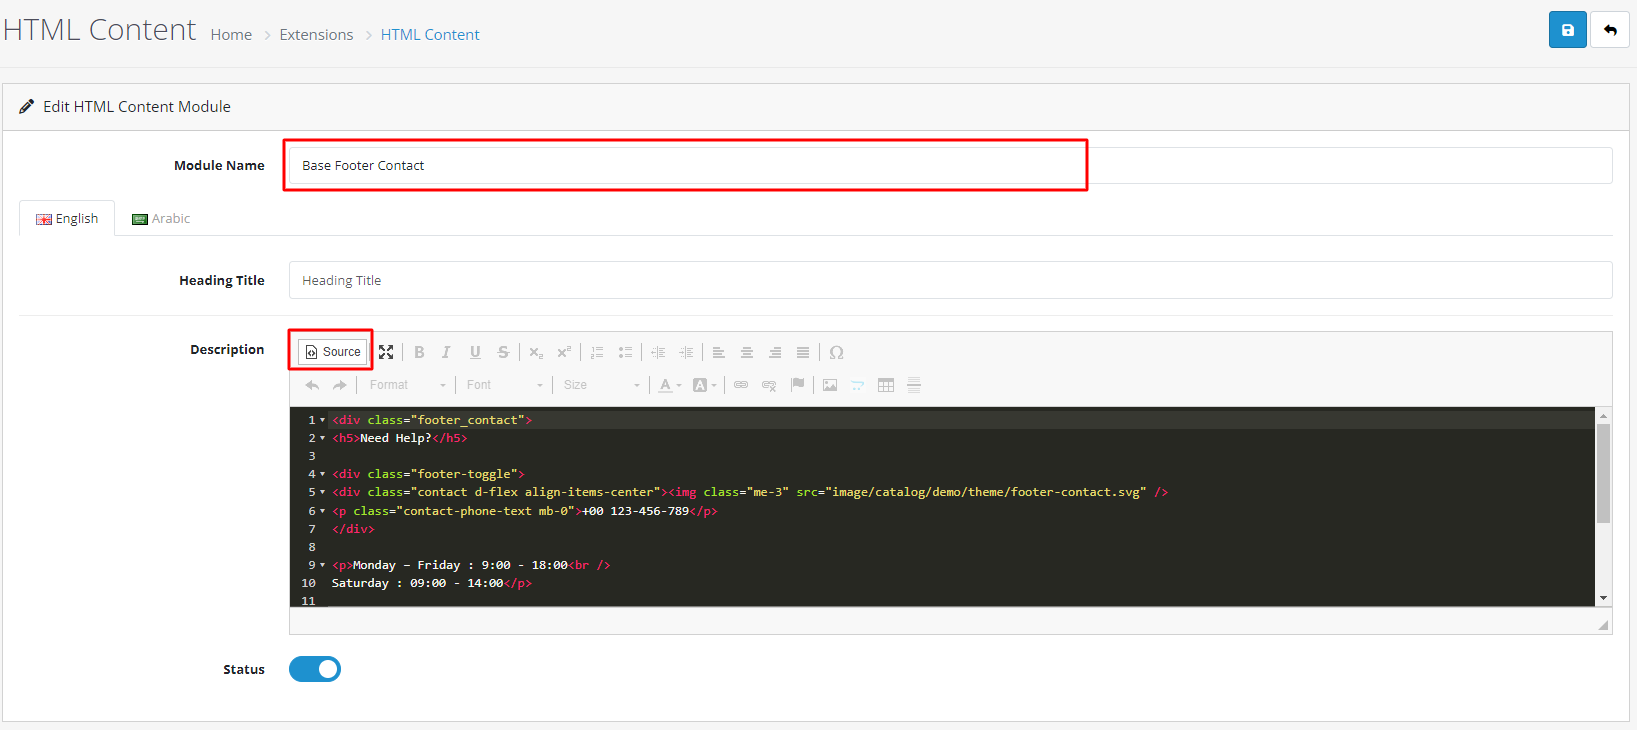
4 : For Base Footer Contact
- Again Click on Add Module to add cms block.
- Give Module Name: Base Footer Contact
- Now click on Code View button in text editor block ,copy and paste this code, After this again
click on Code View button to save your HTML content. From status select Enabled.
- Now click on “Save” button.
Need Help?
Need Help?


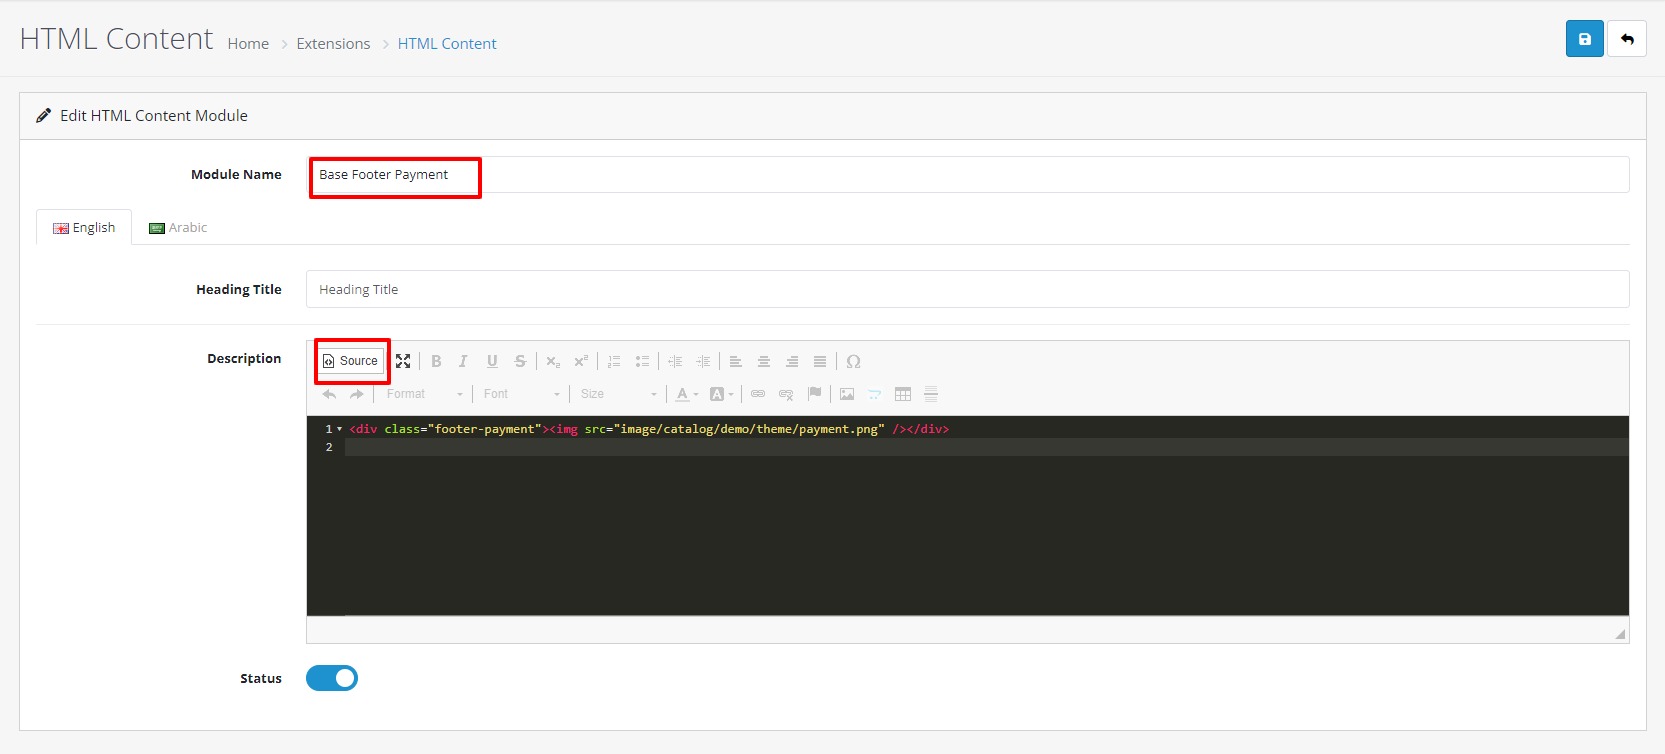
5 : For Base Footer Payment
- Again Click on Add Module to add cms block.
- Give Module Name: Base Footer Payment
- Now click on Code View button in text editor block ,copy and paste this code, After this again
click on Code View button to save your HTML content. From status select Enabled.
- Now click on “Save” button.

6 : For Base Header Contact Cms
- Again Click on Add Module to add cms block.
- Give Module Name: Base Header Top CMS
- Now click on Code View button in text editor block ,copy and paste this code, After this again
click on Code View button to save your HTML content. From status select Enabled.
- Now click on “Save” button.
 Need Help? +00 123-456-789

Need Help? +00 123-456-789
6 : For Base Header Top CMS
- Again Click on Add Module to add cms block.
- Give Module Name: Base Header Top CMS
- Now click on Code View button in text editor block ,copy and paste this code, After this again
click on Code View button to save your HTML content. From status select Enabled.
- Now click on “Save” button.
Save up to 20% on all Toys & Accessories with “FLAT26OFF” code

Save up to 20% on all Toys & Accessories with “FLAT26OFF” code
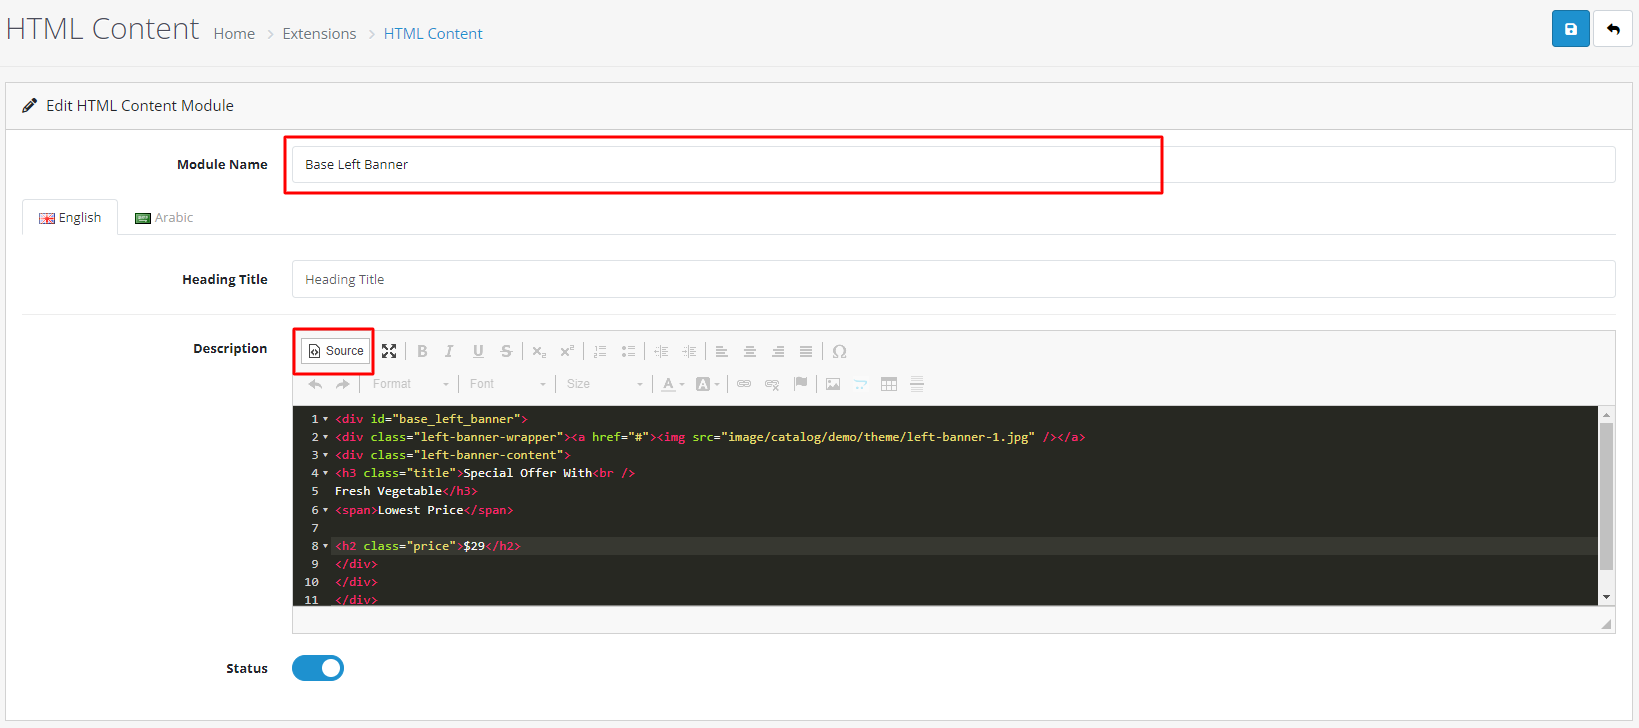
7 : For Base Left Banner
- Again Click on Add Module to add cms block.
- Give Module Name: Base Left Banner
- Now click on Code View button in text editor block ,copy and paste this code, After this again click on
Code View button to save your HTML content. From status select Enabled.
- Now click on “Save” button.

8 : Base Footer AboutUs CMS
- Again Click on Add Module to add cms block.
- Give Module Name: Base Footer AboutUs CMS
- Now click on Code View button in text editor block ,copy and paste this code, After this again click on
Code View button to save your HTML content. From status select Enabled.
- Now click on “Save” button.


9 : Base Base Secondary Navigation
- Again Click on Add Module to add cms block.
- Give Module Name: Base Secondary Navigation
- Now click on Code View button in text editor block ,copy and paste this code, After this again click on
Code View button to save your HTML content. From status select Enabled.
- Now click on “Save” button.

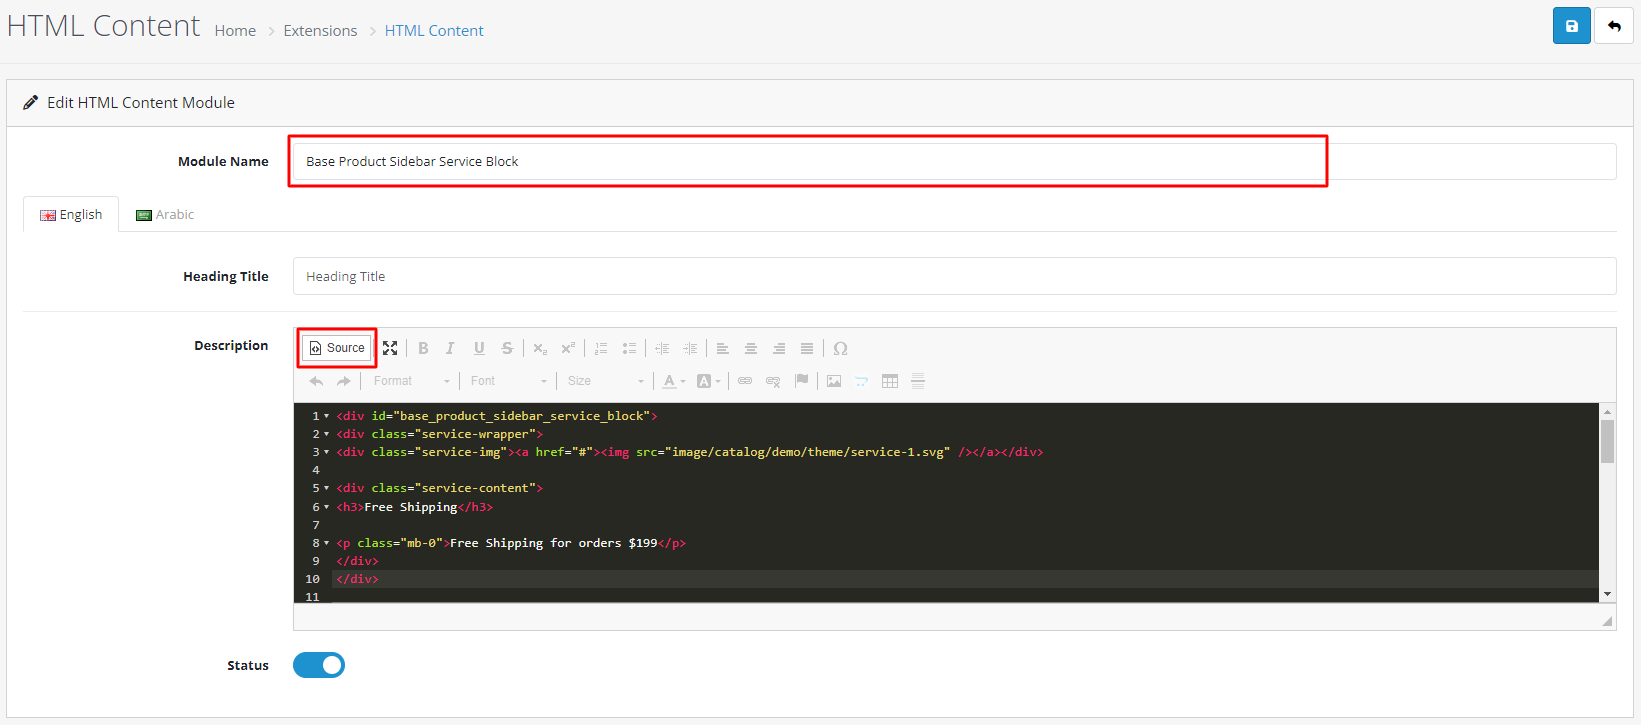
10 :Base Product Sidebar Service Block
- Again Click on Add Module to add cms block.
- Give Module Name: Base Product Sidebar Service Block
- Now click on Code View button in text editor block ,copy and paste this code, After this again click on
Code View button to save your HTML content. From status select Enabled.
- Now click on “Save” button.
                            Free Shipping

                            Free Shipping for orders $199


                            Returns Policy

                            Within 30 days exchange


                            Online Support

                            24 hours a day, 7 days a week


                            Flexible Payment

                            Pay with Multiple Credit cards
Free Shipping
Free Shipping for orders $199
Returns Policy
Within 30 days exchange
Online Support
24 hours a day, 7 days a week
Flexible Payment
Pay with Multiple Credit cards
Step-8 : Sidebar Information Block
- Go to Extensions >Extensions. Select Modules from Dropdown.
- Now select Information, then Edit (Click on Install link if Edit link in not there).
- From Status select Enable.
- Click on “Save” button.
Step-9 : Sidebar Filter Block
- Go to Extensions >Extensions. Select Modules from Dropdown.
- Now select Filter, then Edit (Click on Install link if Edit link in not there).
- From Status select Enable.
- Click on “Save” button.
Step-10 : Account
- Go to Extensions >Extensions. Select Modules from Dropdown.
- Now select Account, then Edit (Click on Install link if Edit link in not there).
- From Status select Enable.
- Click on “Save” button.
Step-11 : Google-Map(Contact Us Page)
- Go to System >. Select Setting from Dropdown.
- Now select Store-Tab
- Enter your store's Geocode.
- Click on “Save” button.

Theme Setting
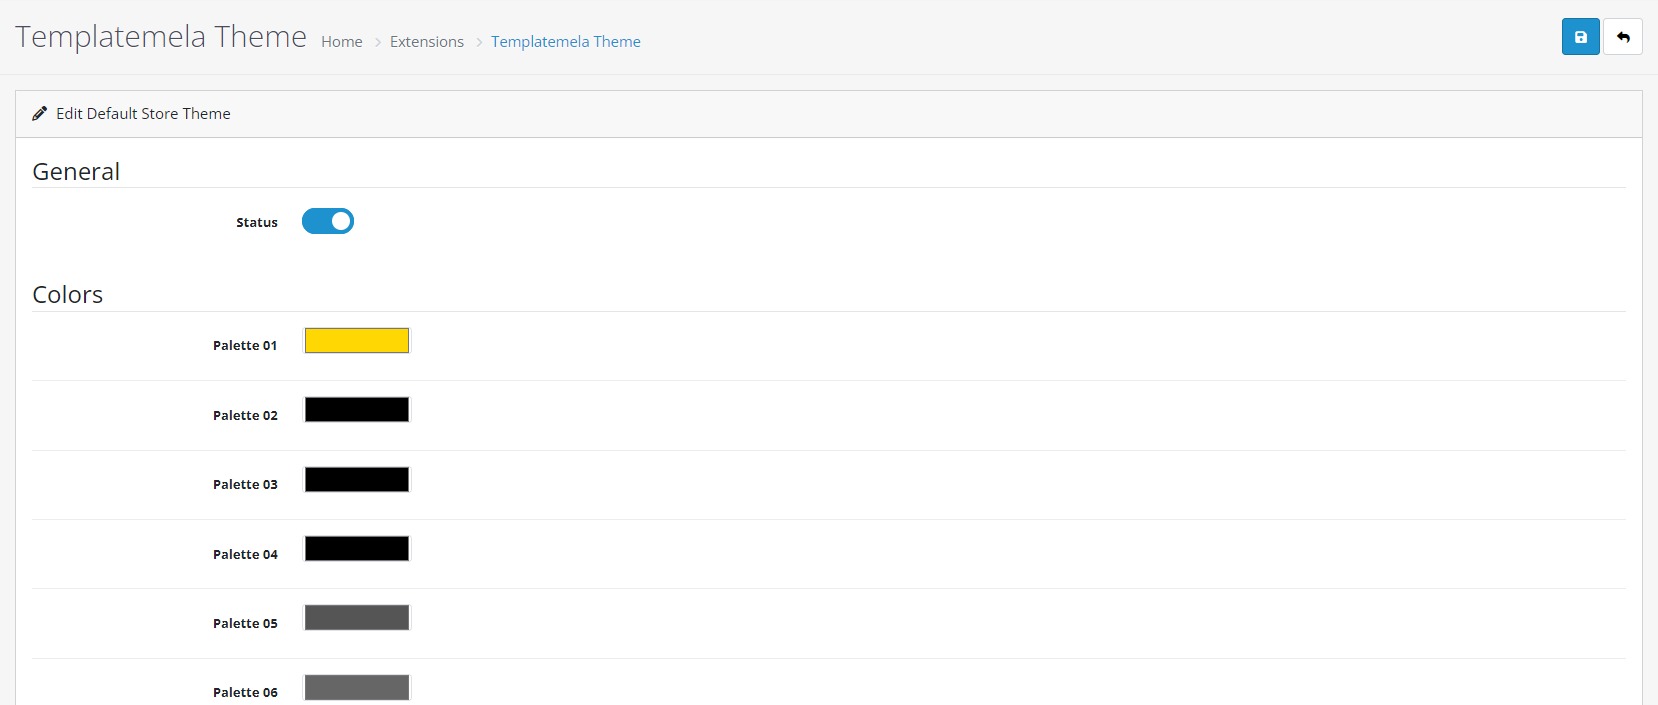
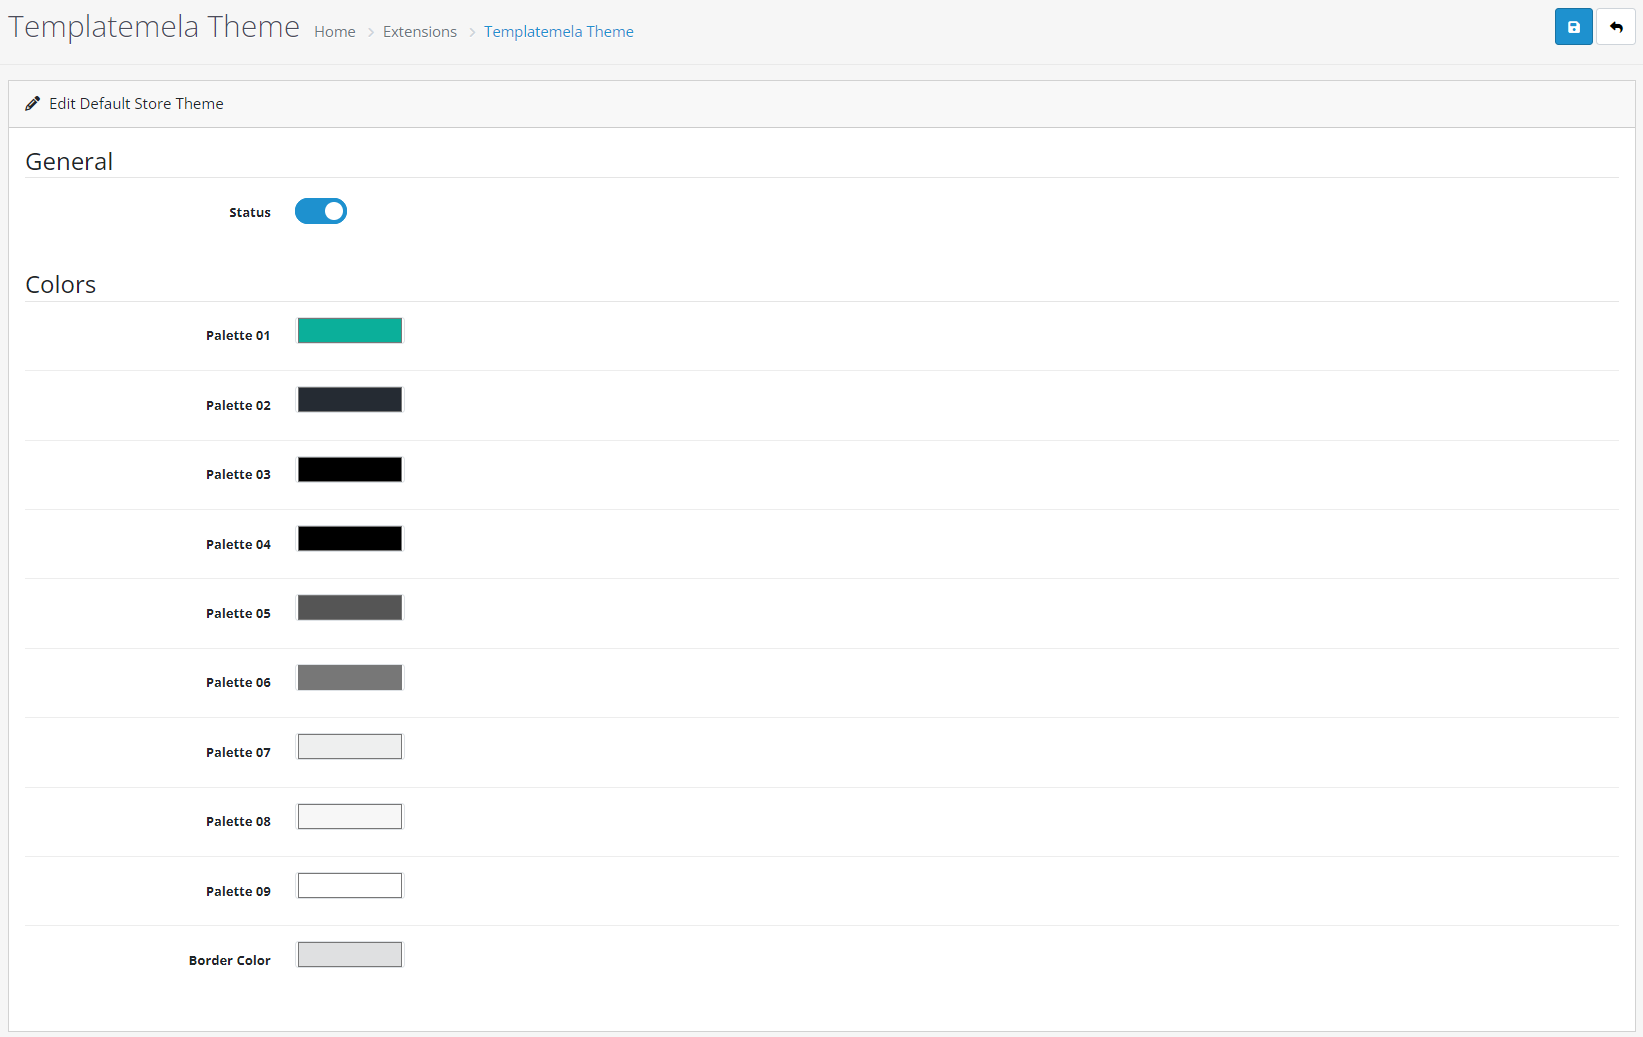
1 : Theme
- Under Admin Panel > Extensions > Extensions,
- Select Themes from Dropdown as shown below,
- Now click on Edit button of Your Store.
- Select “Templatemela Theme” into Theme Directory field.
- Status Enabled.
- You can Also Customize Your Theme Color Palette Here.
2 : Logo
- For Logo setting , Go to System > Setting > Edit > General
- From Store Logo you can upload your logo image.
- Now click on Edit button of Your Store.
Module Setting
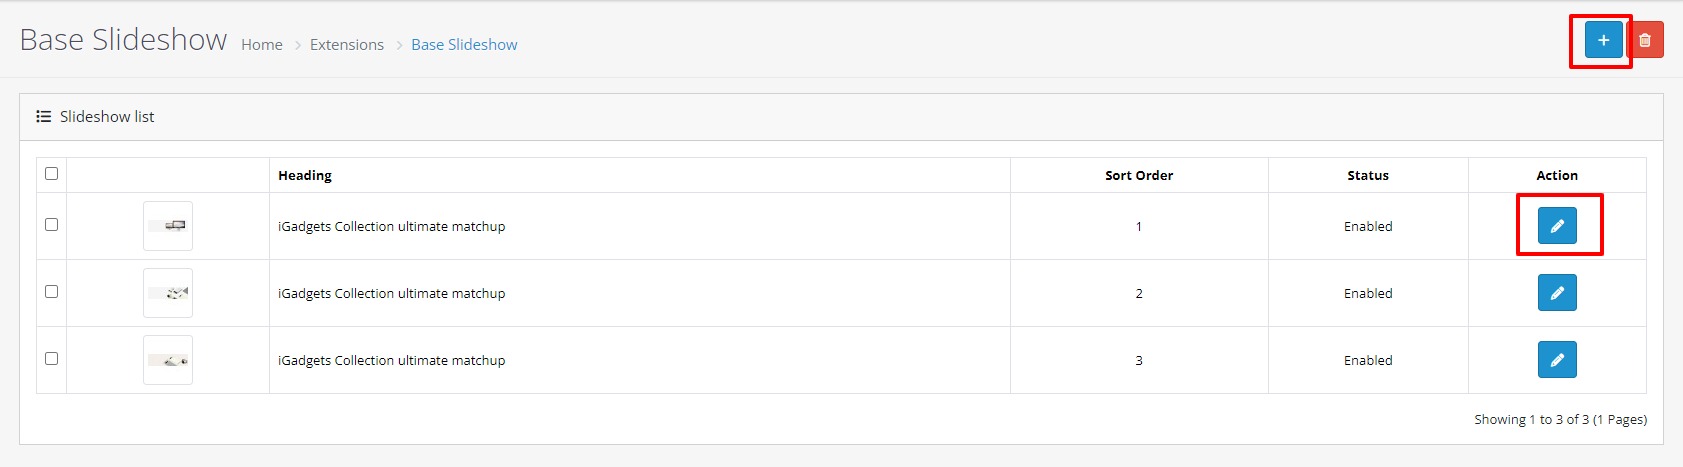
1 : Base Slideshow
- Go to Extensions > Extensions. Select Modules from Dropdown.
- Now select Base Slideshow, then Edit (Click on Install link if Edit link in not there)
- For Slider Module.
- Give Module Name = Base Slideshow
- Give Limit = 10.
- Give Image size (1903 X 580).
- From Status select Enable.
- Click on “Save” button.
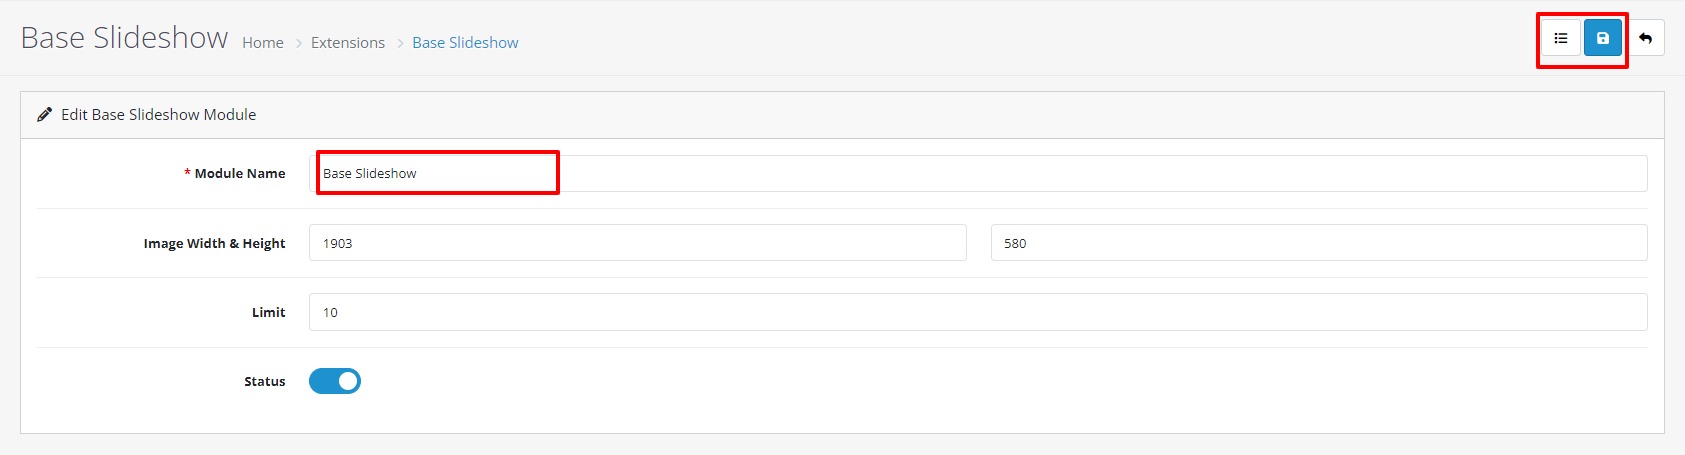
- Then Go To The list icon.
- Now Click On Add New Button, then Edit .
- Click on “Save” button.
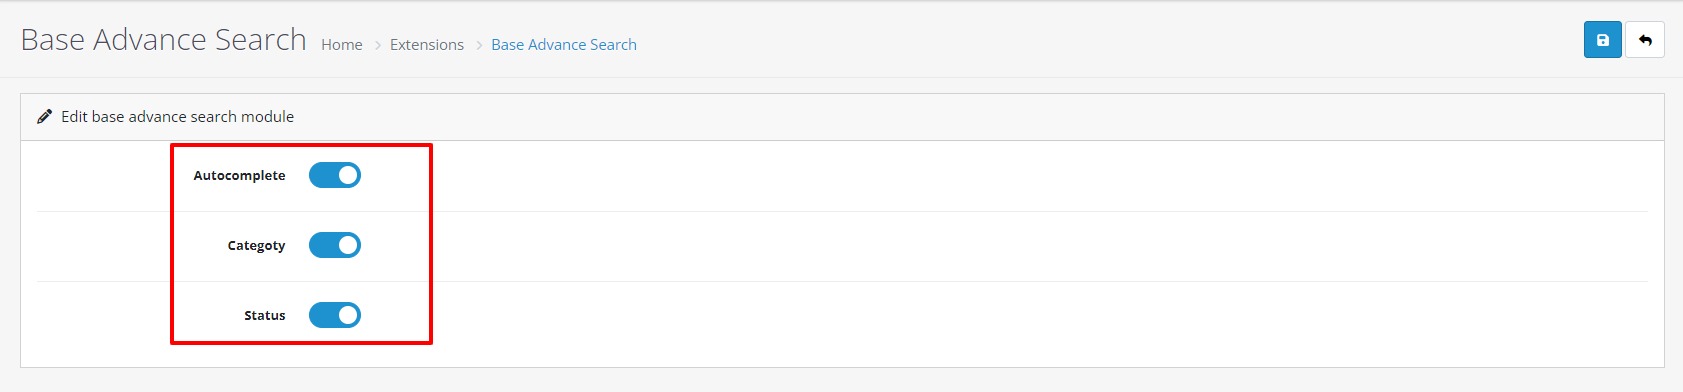
2 : Base Advance Search
- Go to Extensions > Extensions. Select Modules from Dropdown.
- Now select Base Advance Search, then Edit (Click on Install link if Edit link in not there)
- From Autocomplete select Enable.
- From Categoty select Enable.
- From Status select Enable.
- Click on “Save” button.
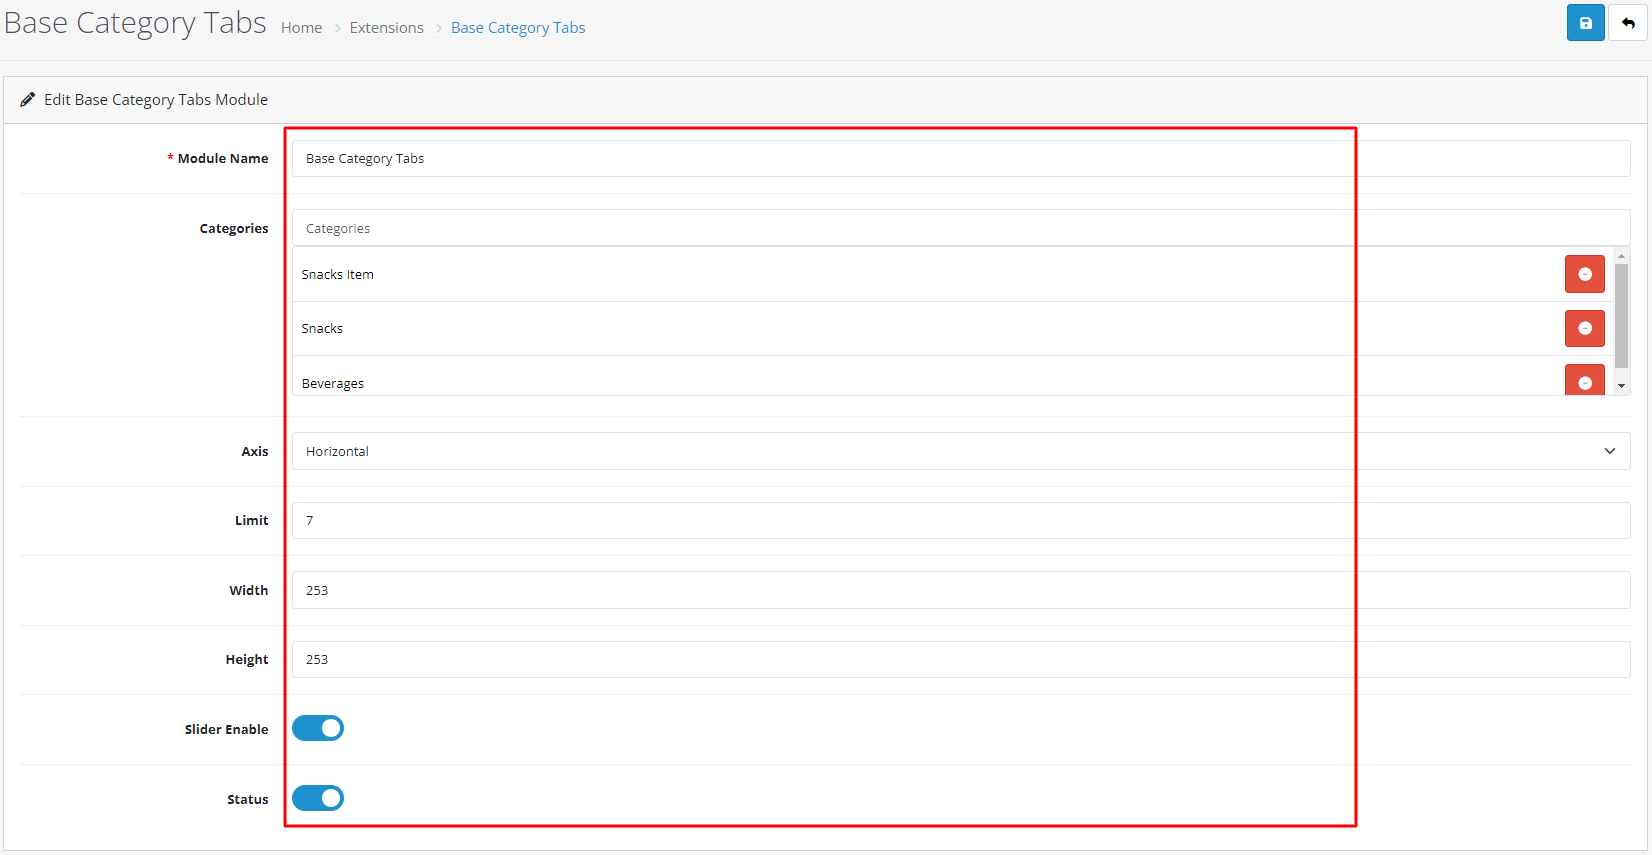
3 : Base Category Tabs
- Go to Extensions > Extensions. Select Modules from Dropdown.
- Now select Base Category Tabs, then Edit (Click on Install link if Edit link in not there).
- Give Module Name = Base Category Tabs
- For Category Select As you like..
- For Axis Select Theme Wise (Horizontal OR Vertical).
- Give Limit = 7.
- Give Image size (253 X 253).
- From Status select Enable.
- Click on “Save” button.
4 : Base Top Deal Product
- Go to Extensions > Extensions. Select Modules from Dropdown.
- Now select Base Top Deal Product, then Edit (Click on Install link if Edit link in not there).
- Give Module Name = Base Top Deal Product
- For Axis Select Theme Wise (Horizontal OR Vertical).
- Give Limit = 7.
- Give Image size (253 X 253).
- From Status select Enable.
- Click on “Save” button.

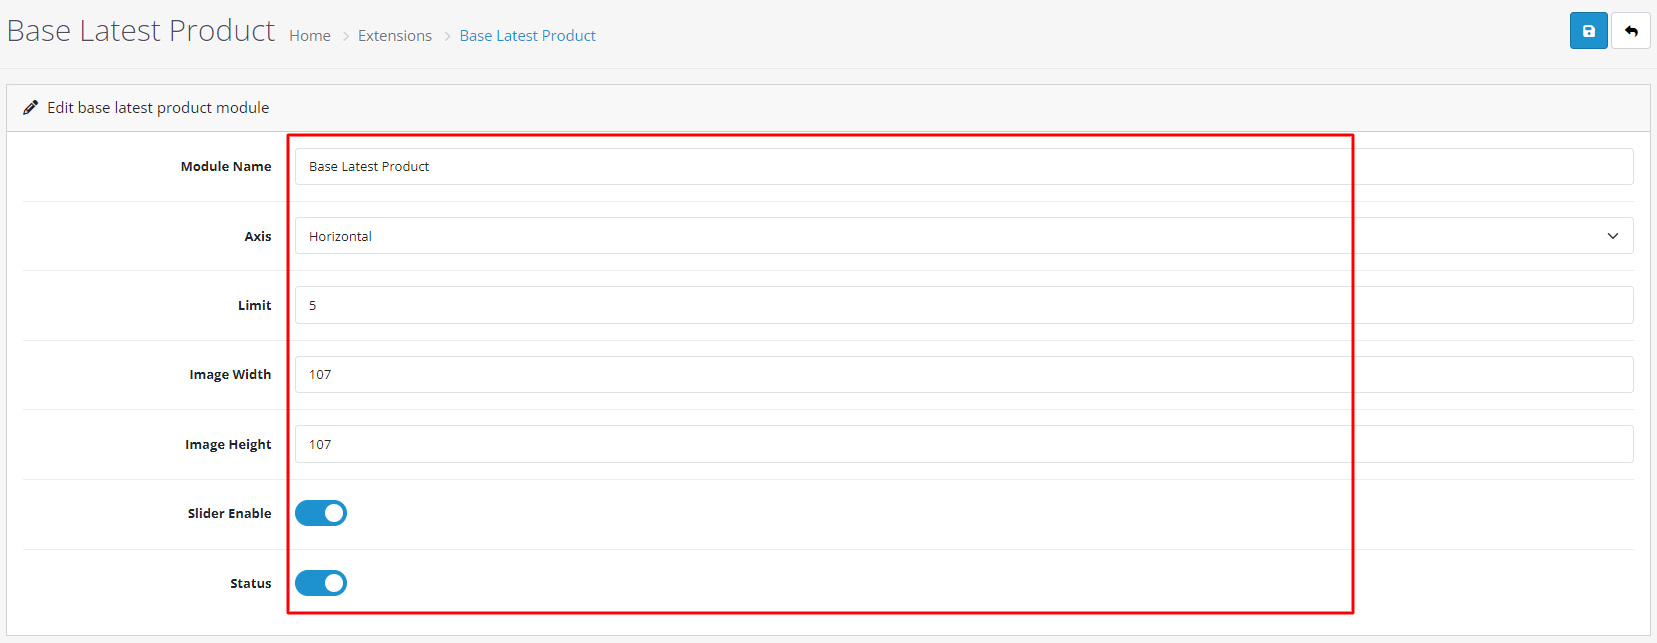
5 : Base Latest Product
- Go to Extensions > Extensions. Select Modules from Dropdown.
- Now select Base Latest Product, then Edit (Click on Install link if Edit link in not there).
- Give Module Name = Base Latest Product
- For Axis Select Theme Wise (Horizontal OR Vertical).
- Give Limit = 5.
- Give Image size (107 X 107).
- From Status select Enable.
- Click on “Save” button.
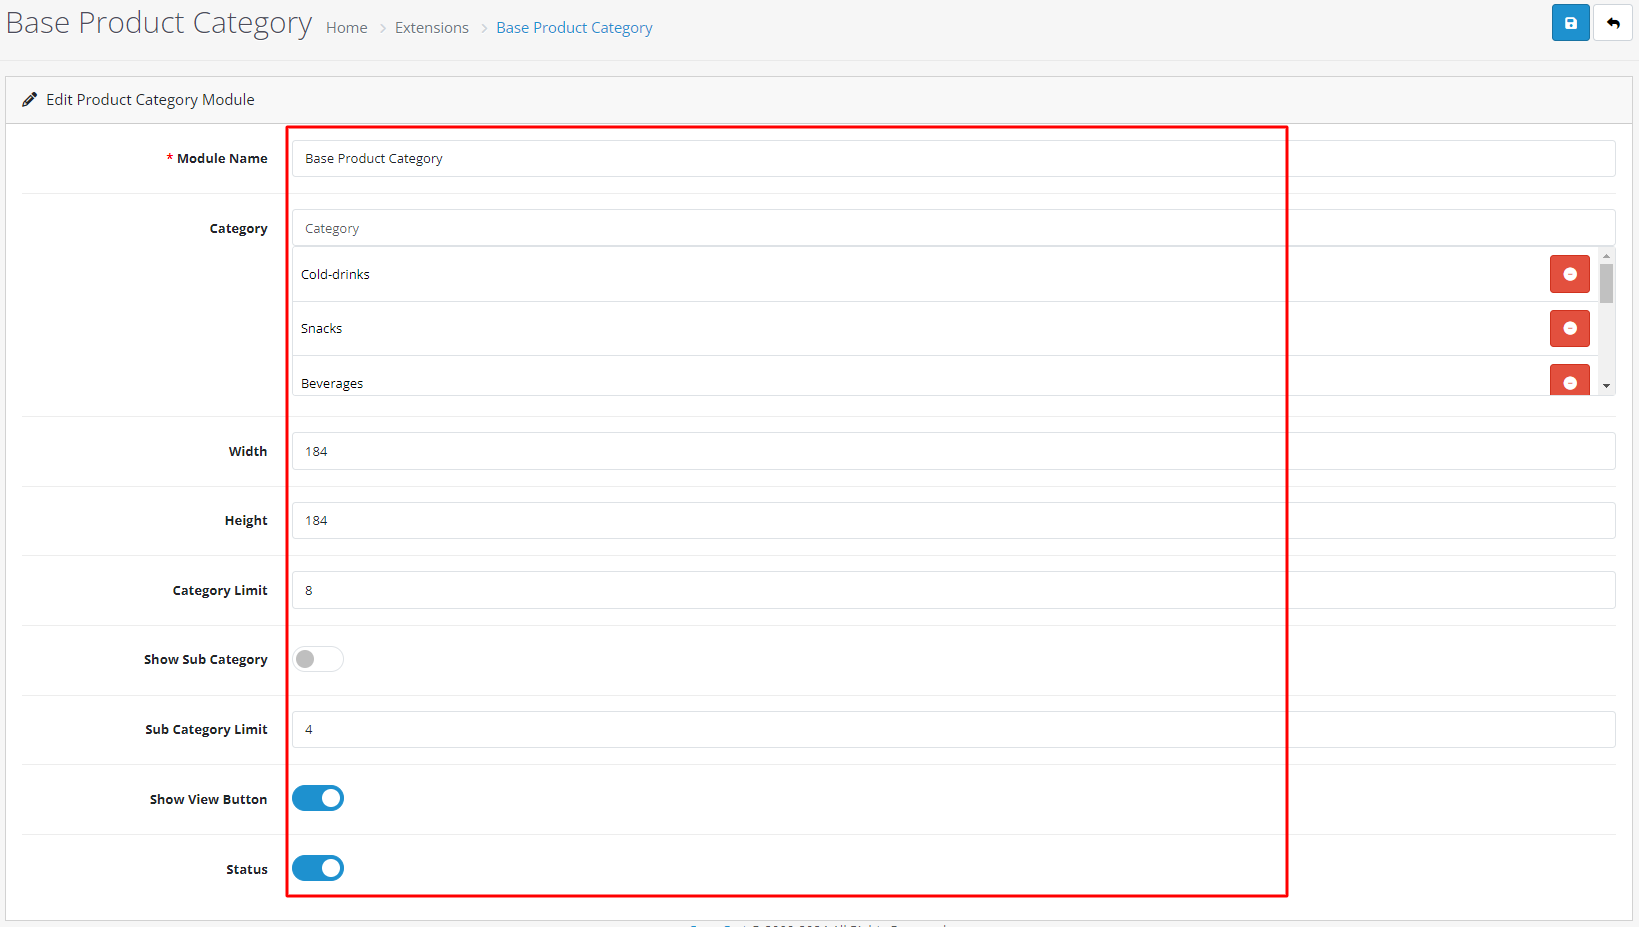
6 : Base Product Category
- Go to Extensions > Extensions. Select Modules from Dropdown.
- Now select Base Product Category, then Edit (Click on Install link if Edit link in not there).
- Give Module Name = Base Product Category
- Select Product Cateogries = As you Like.
- Give Image size (184 X 184).
- Give Category Limit = 8.
- Show Sub Category = Enable(if you want to show sub categories in home page).
- Give Sub Category Limit = 4.
- From Show View Button Enable(if you want to show view button in categories).
- From Status select Enable.
- Click on “Save” button.
7 : Base Newsletter
- Go to Extensions > Extensions. Select Modules from Dropdown.
- Now select Base Newsletter Popup, then Edit (Click on Install link if Edit link in not there).

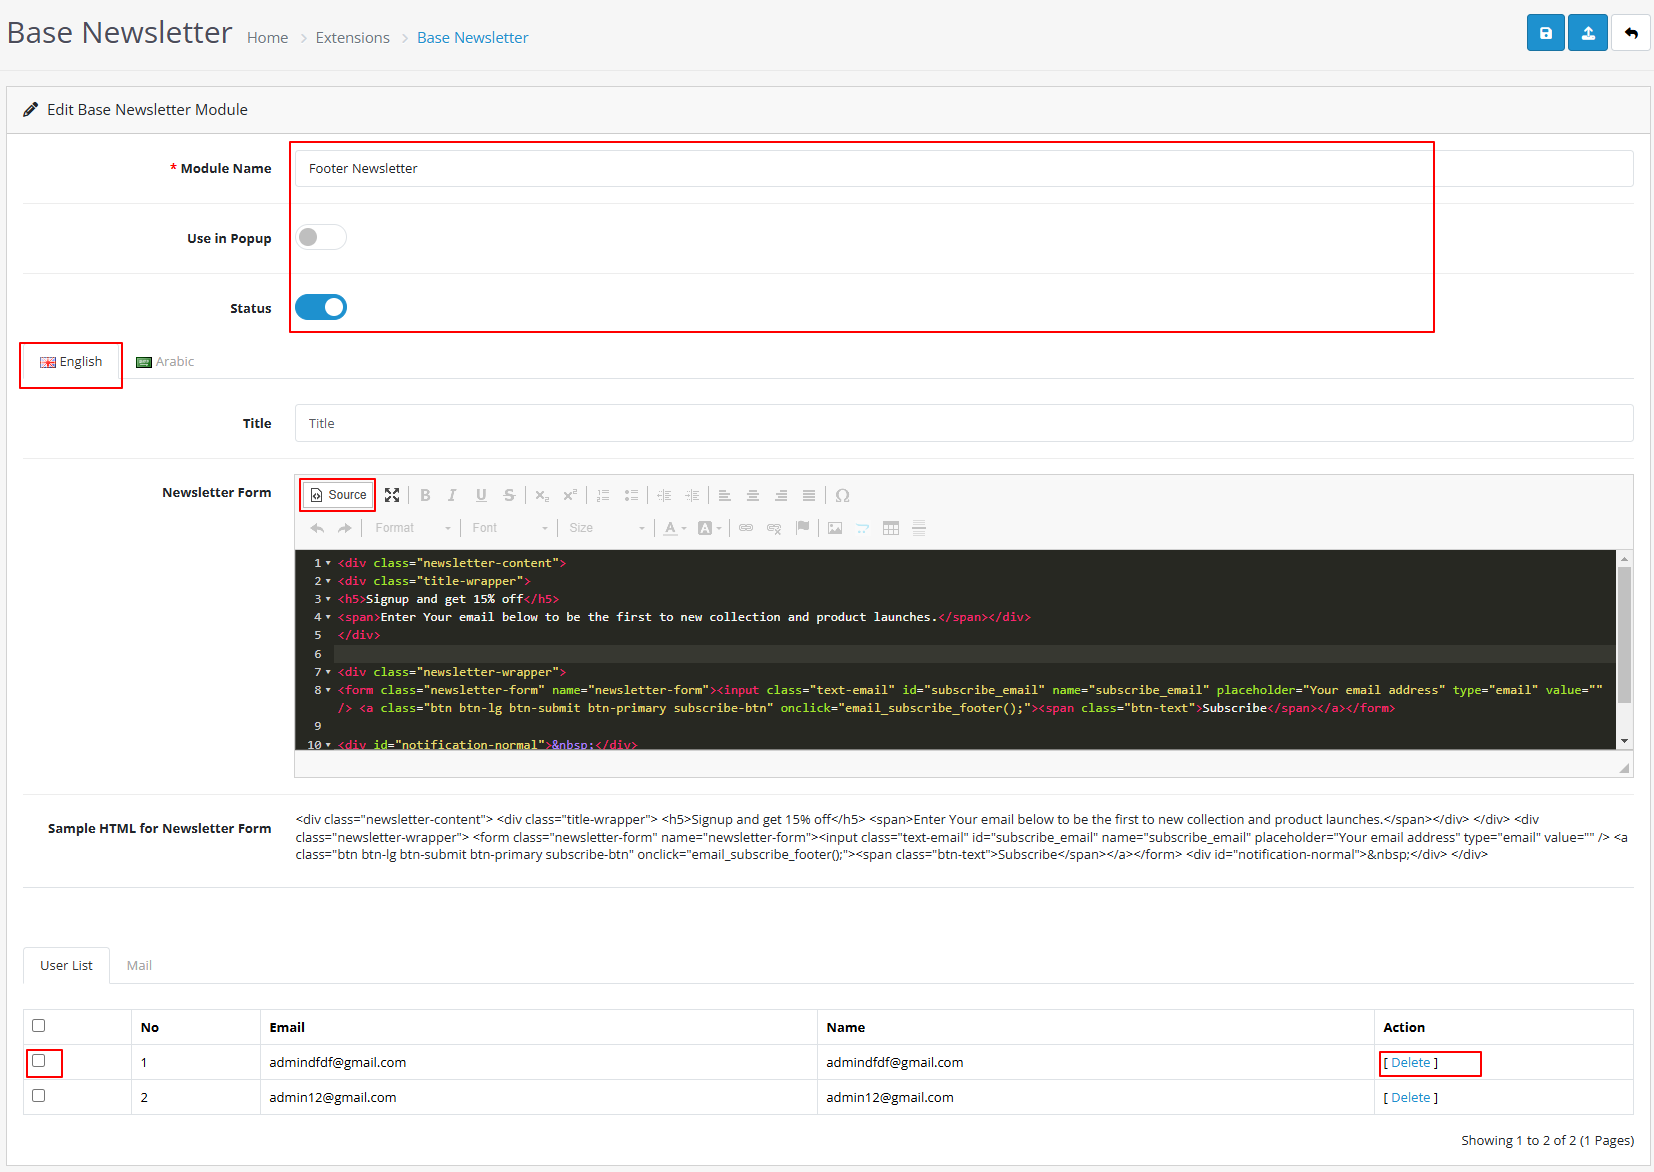
7.1 : Footer Newsletter
- Go to Extensions > Extensions. Select Modules from Dropdown.
- Now select Footer Newsletter, then Edit (Click on Install link if Edit link in not there).
- Give Module Name = As you Like.
- Give Use in Popup = Disable.
- Give Status = Active.
- Give User list = check select(Select for delete email)delete.
- Now click on Code View button in text editor block ,copy and paste this code, After this again click on Code View button to save your HTML content. From status select Enabled.
- Now click on “Save” button.
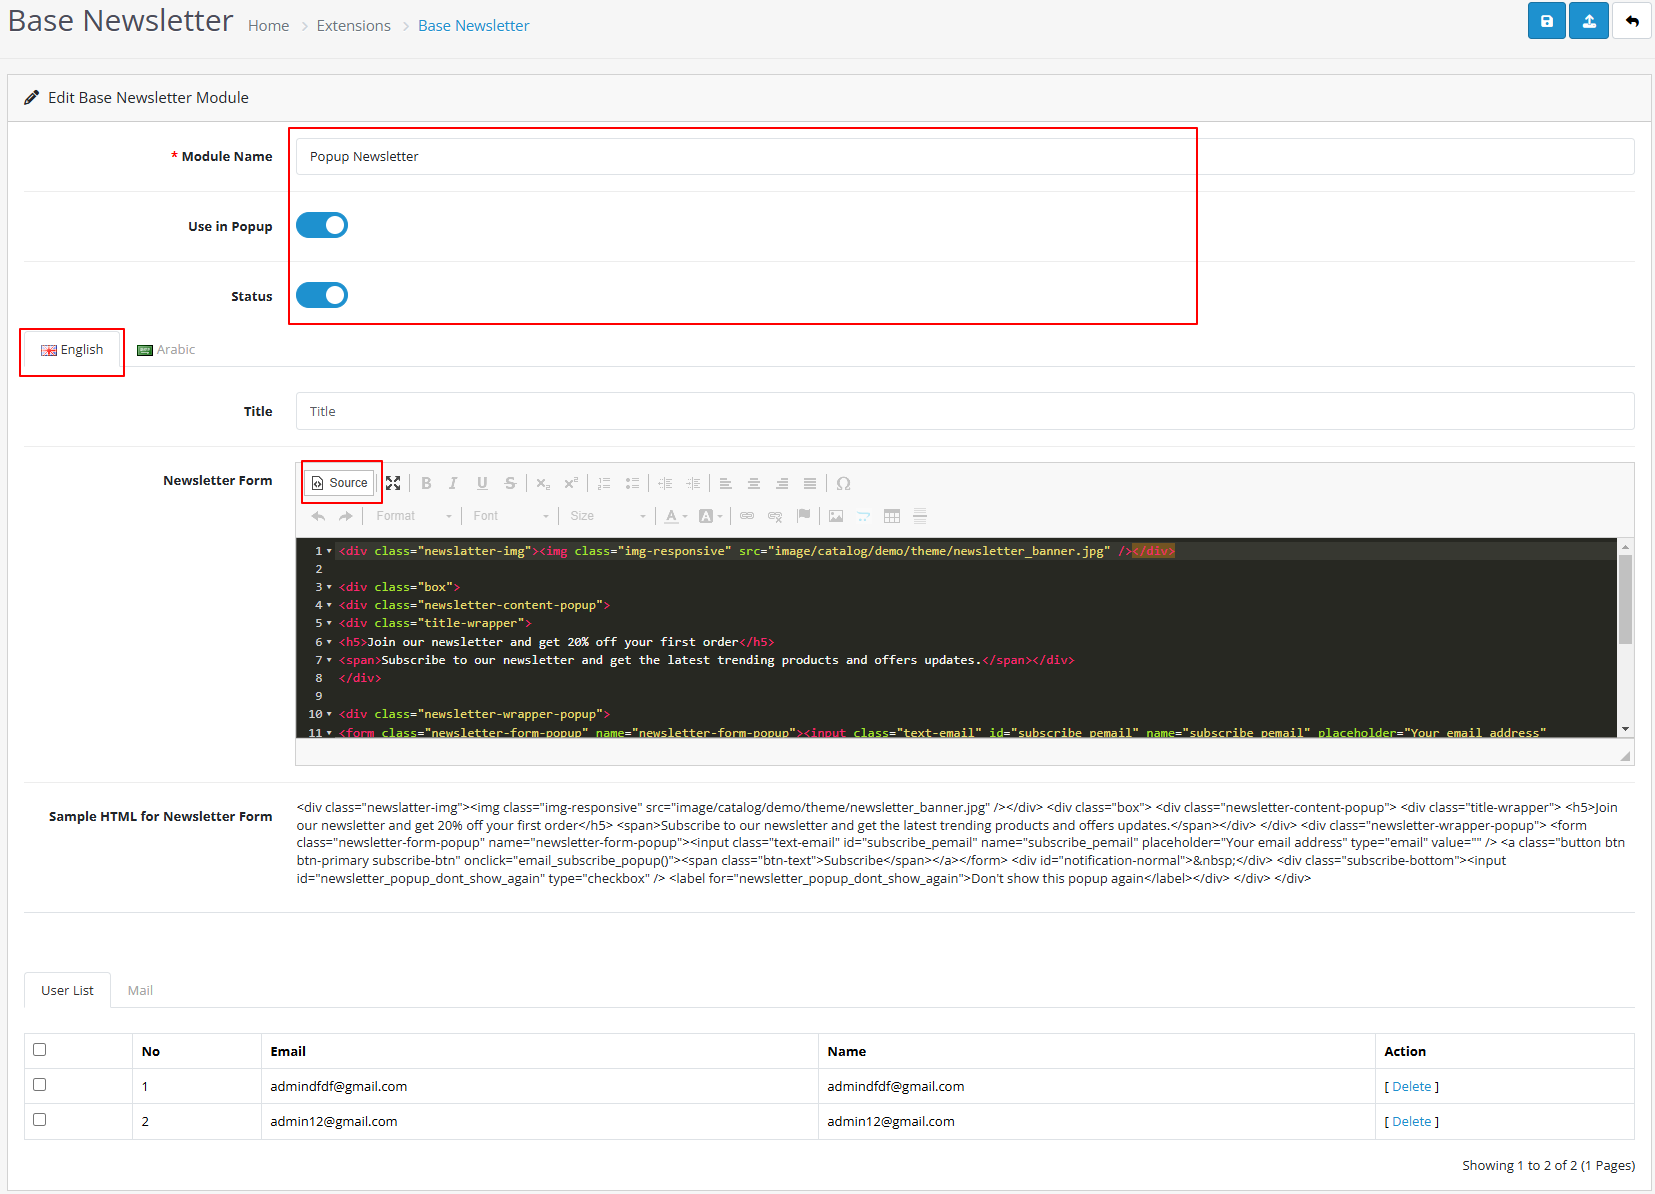
7.2 : Popup Newsletter
- Go to Extensions > Extensions. Select Modules from Dropdown.
- Now select Popup Newsletter, then Edit (Click on Install link if Edit link in not there).
- Give Module Name = As you Like.
- Give Use in Popup = Enable.
- Give Status = Active.
- Give User list = check select(Select for delete email)delete.
- Now click on Code View button in text editor block ,copy and paste this code, After this again click on Code View button to save your HTML content. From status select Enabled.
- Now click on “Save” button.

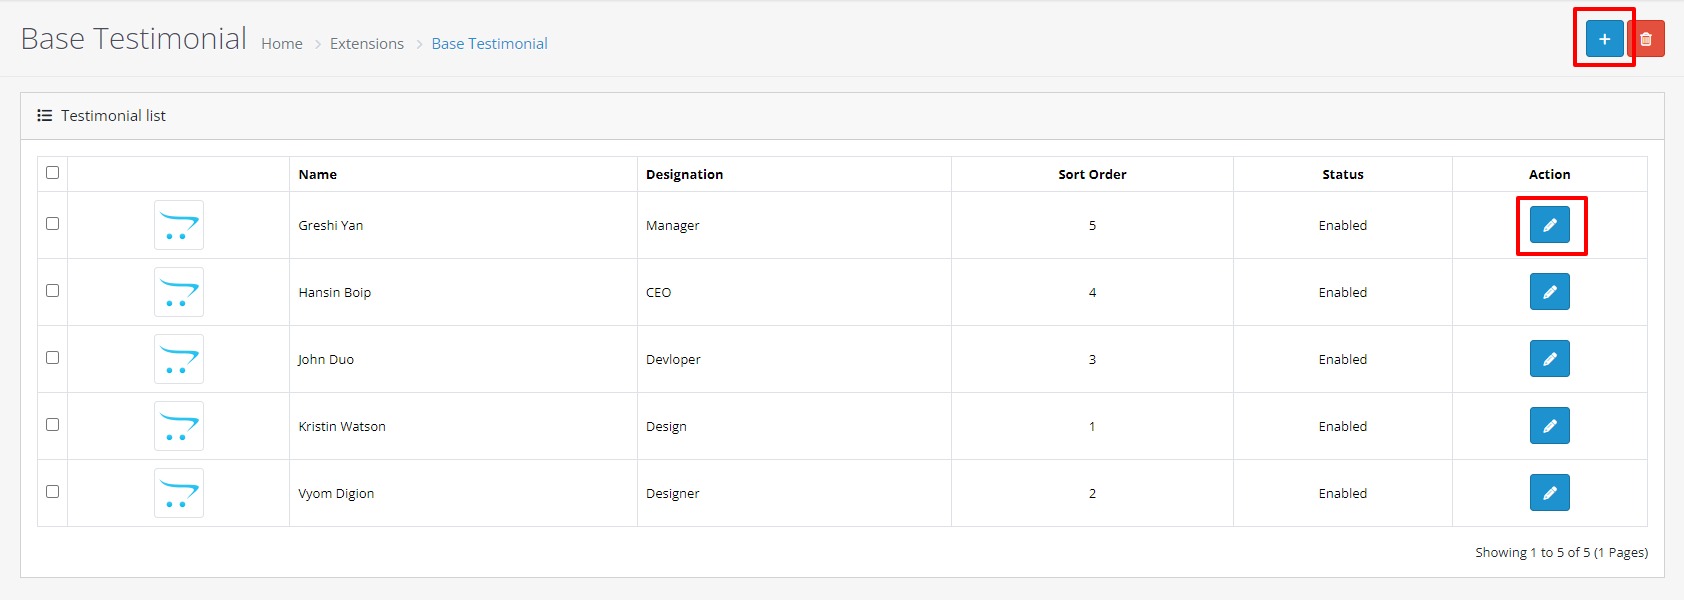
8 : Base Testimonial
- Go to Extensions > Extensions. Select Modules from Dropdown.
- Now select Base Testimonial, then Edit (Click on Install link if Edit link in not there)
- Give Module Name = Base Testimonial
- Give Title = as you like
- Give Image size (80 X 80).
- From Display Image Select as you like..
- Give Limit = 10.
- From Status select Enable.
- Click on “Save” button.
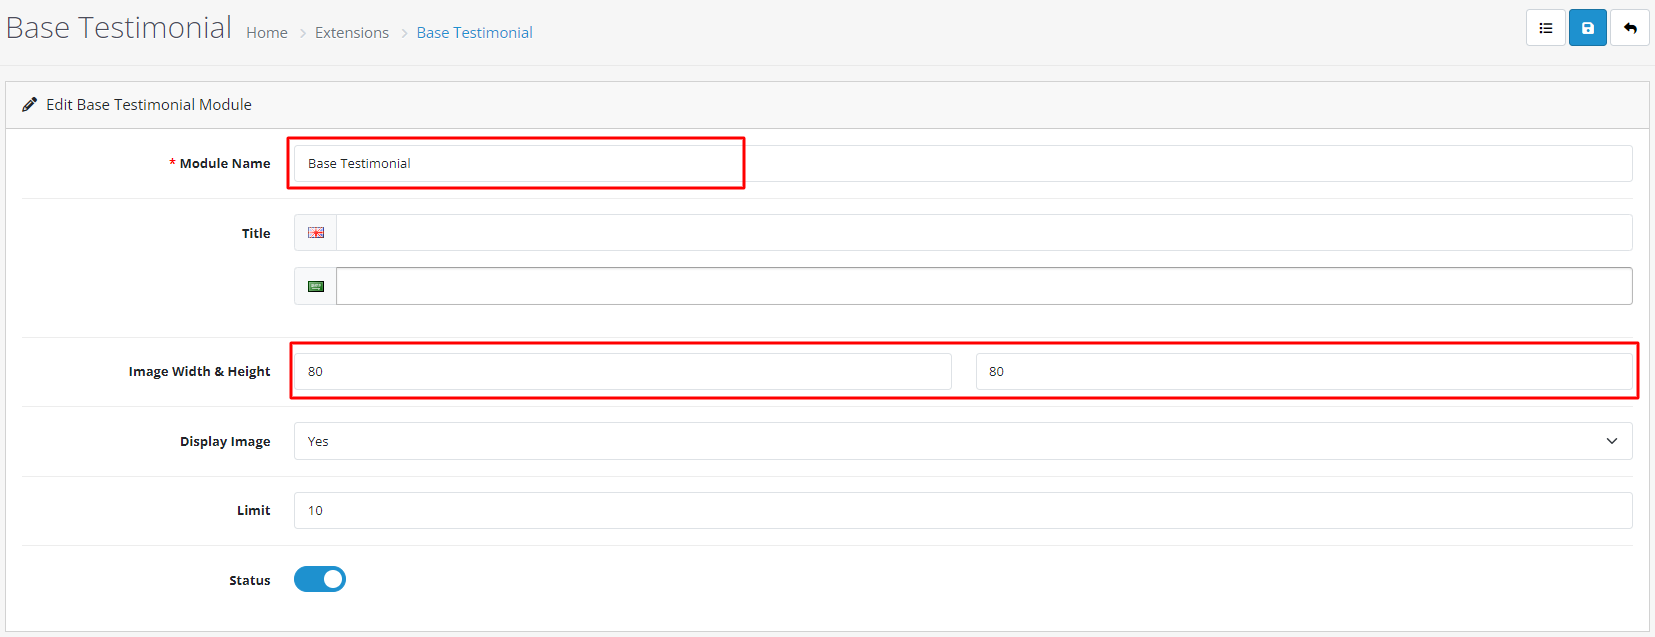
- Then Go To The list icon.
- Now Click On Add New Button, then Edit .
- Click on “Save” button.
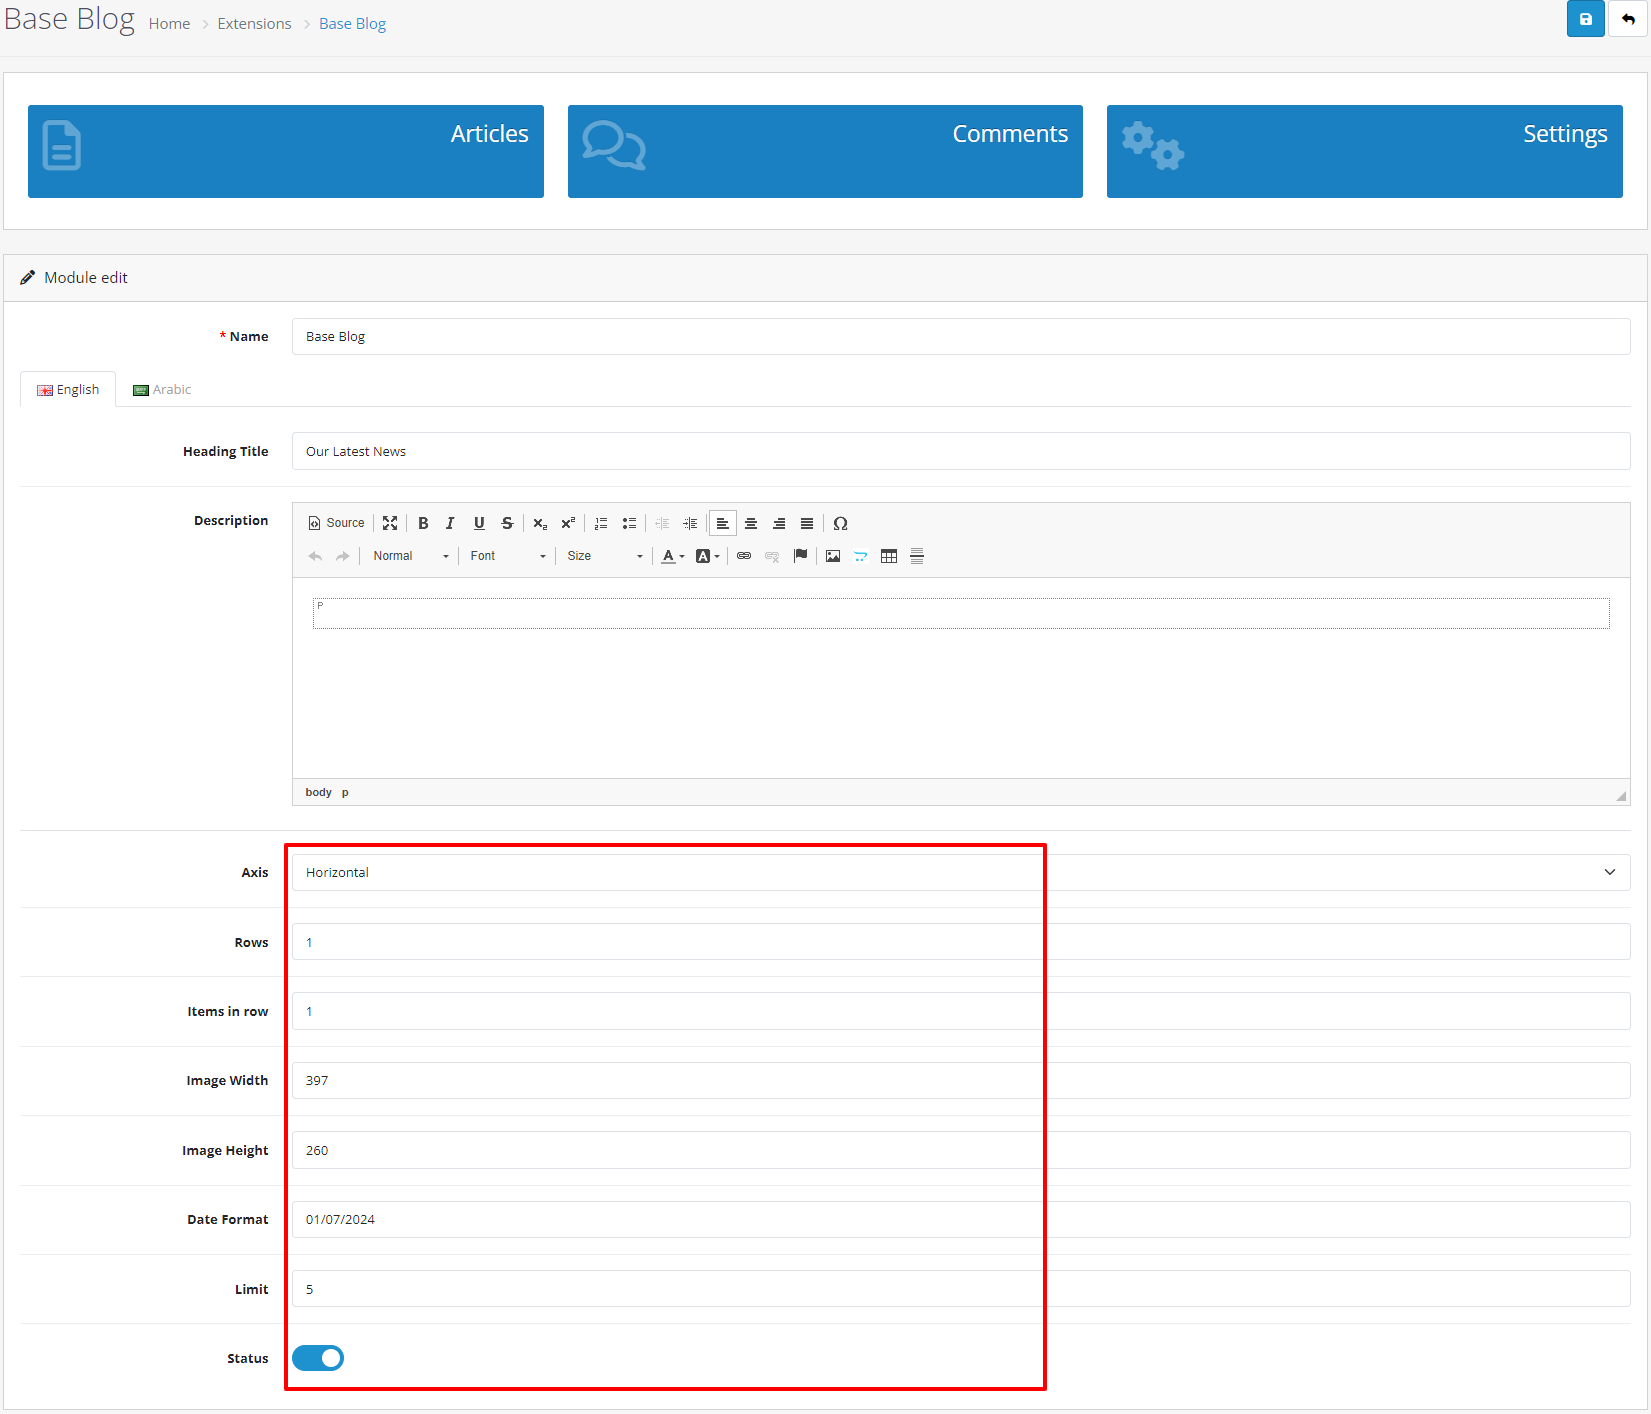
9 : Base Blog
- Go to Extensions > Extensions. Select Modules from Dropdown.
- Now select Base Blog, then Edit (Click on Install link if Edit link in not there).
- Give Module Name = Base Blog
- Give Heading Title = As you Like.
- Give Description = As you Like.
- For Axis Select Theme Wise (Horizontal OR Vertical).
- Give Rows = 1.
- Give Items in row = 1.
- Image Width = 397
- Image Height = 260.
- Date Format = DD/MM/YY
- Limit = 5.
- From Status select Enable.
- Click on “Save” button.
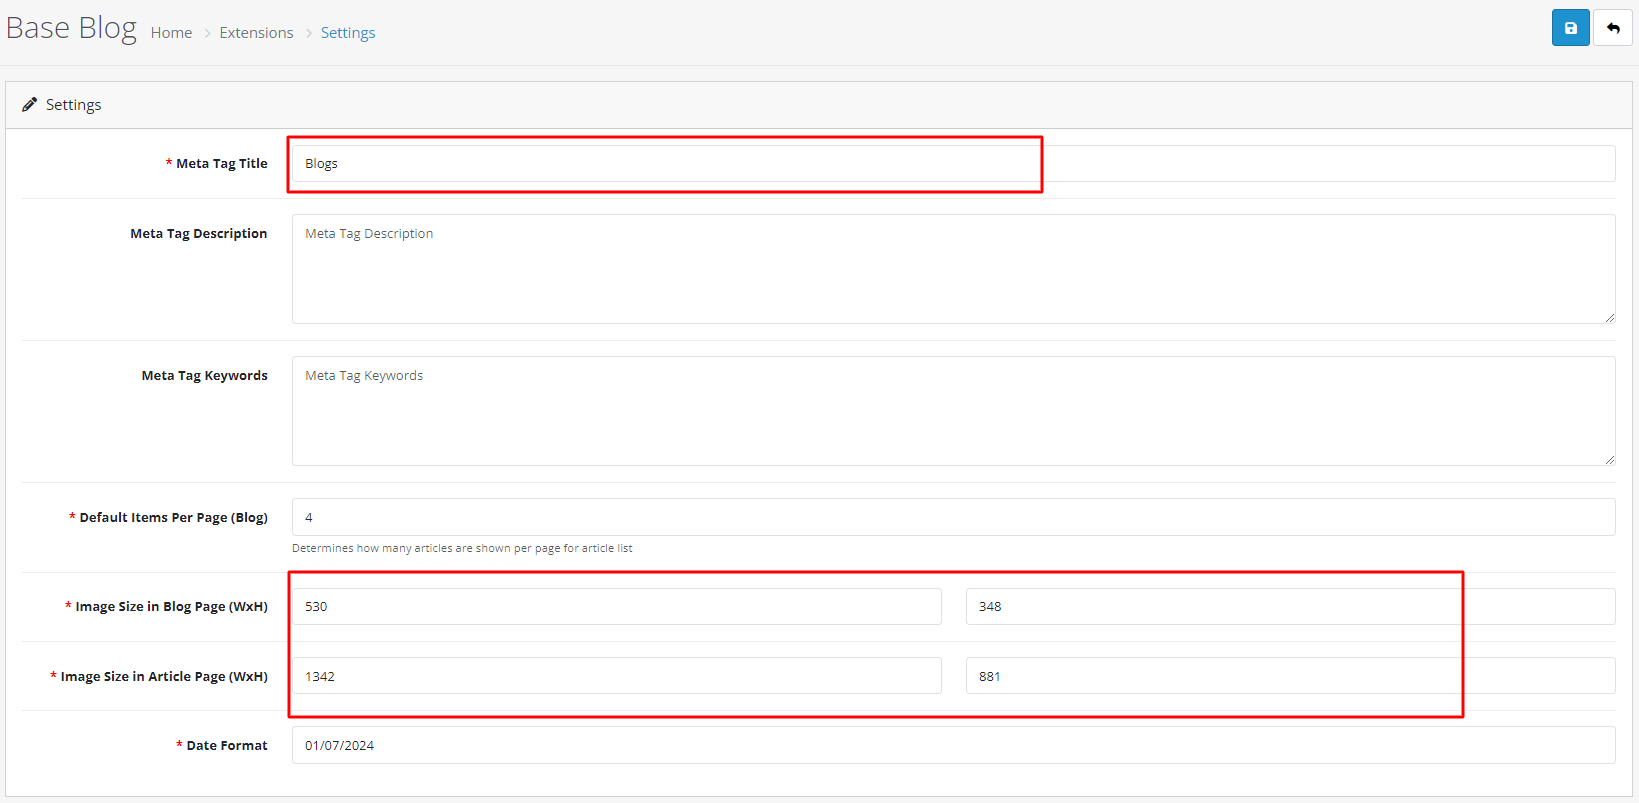
9.1 : Base Blog Settings
- Go to Extensions > Extensions. Select Modules from Dropdown.
- Now select Base Blog Settings, then Edit (Click on Install link if Edit link in not there).
- Give Meta Tag Title = As you Like.
- Give Meta Tag Description = As you Like.
- Give Meta Tag Keywords = As you Like.
- Give Default Items Per Page (Blog) = 4.
- Give Image Size in Blog Page (WxH) = (530 x 348).
- Give Image Size in Article Page (WxH) = (1342 x 881)
- Date Format =EnableDD/MM/YY
- Click on “Save” button.
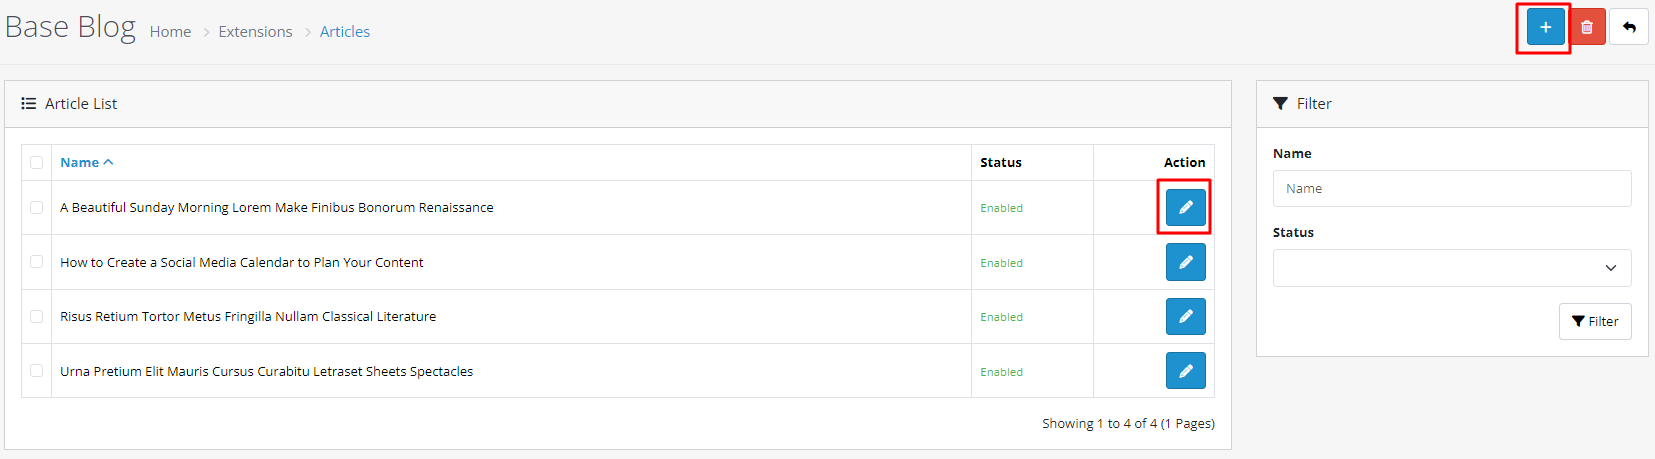
9.2 : Base Blog Articles
- Then Go To The list icon.
- Now Click On Add New Button, then Edit .
- Click on “Save” button.
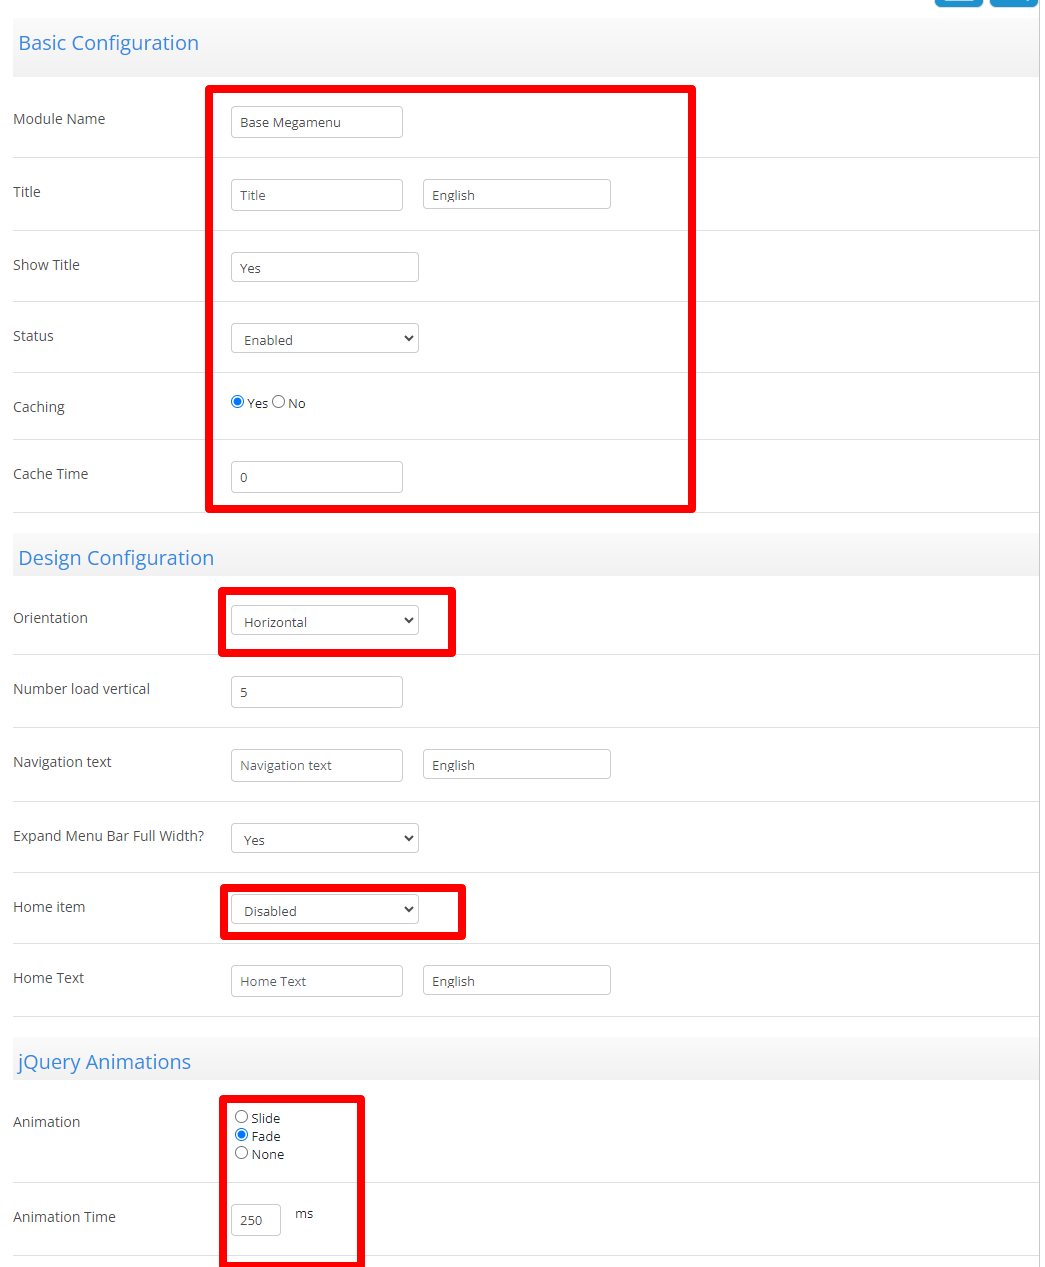
8 : Base Megamenu
- Create Mega menu video
- Go to Extensions > Extensions. Select Modules from Dropdown.
- Now select Base Megamenu, then Edit (Click on Install link if Edit link in not there).
- Give Module Name = Base Megamenu
- Give Title = As you Like.
- Give Show Title = Yes OR No
- From Status select Enable.
- Give Caching = Yes Or No
- Give Caching Time = 0
- Orientation Theme Wise (Horizontal OR Vertical).
- Number Load Verticle = 5.
- Nevigation Text = nevigation text- English(choose your language).
- Expand Menu Bar Full Width? = Yes Or No
- Home item = Disabled
- Home Text = home textEnglish(choose your language).
- Animation = Fade
- Animation Time = 500ms.


11 : Base Quick View
- Go to Extensions >Extensions. Select Modules from Dropdown.
- Now select Base Quick View, then Edit (Click on Install link if Edit link in not there).
- From Status select Enable.
- Click on “Save” button.
→ This Block is used to show a quick view in a product.

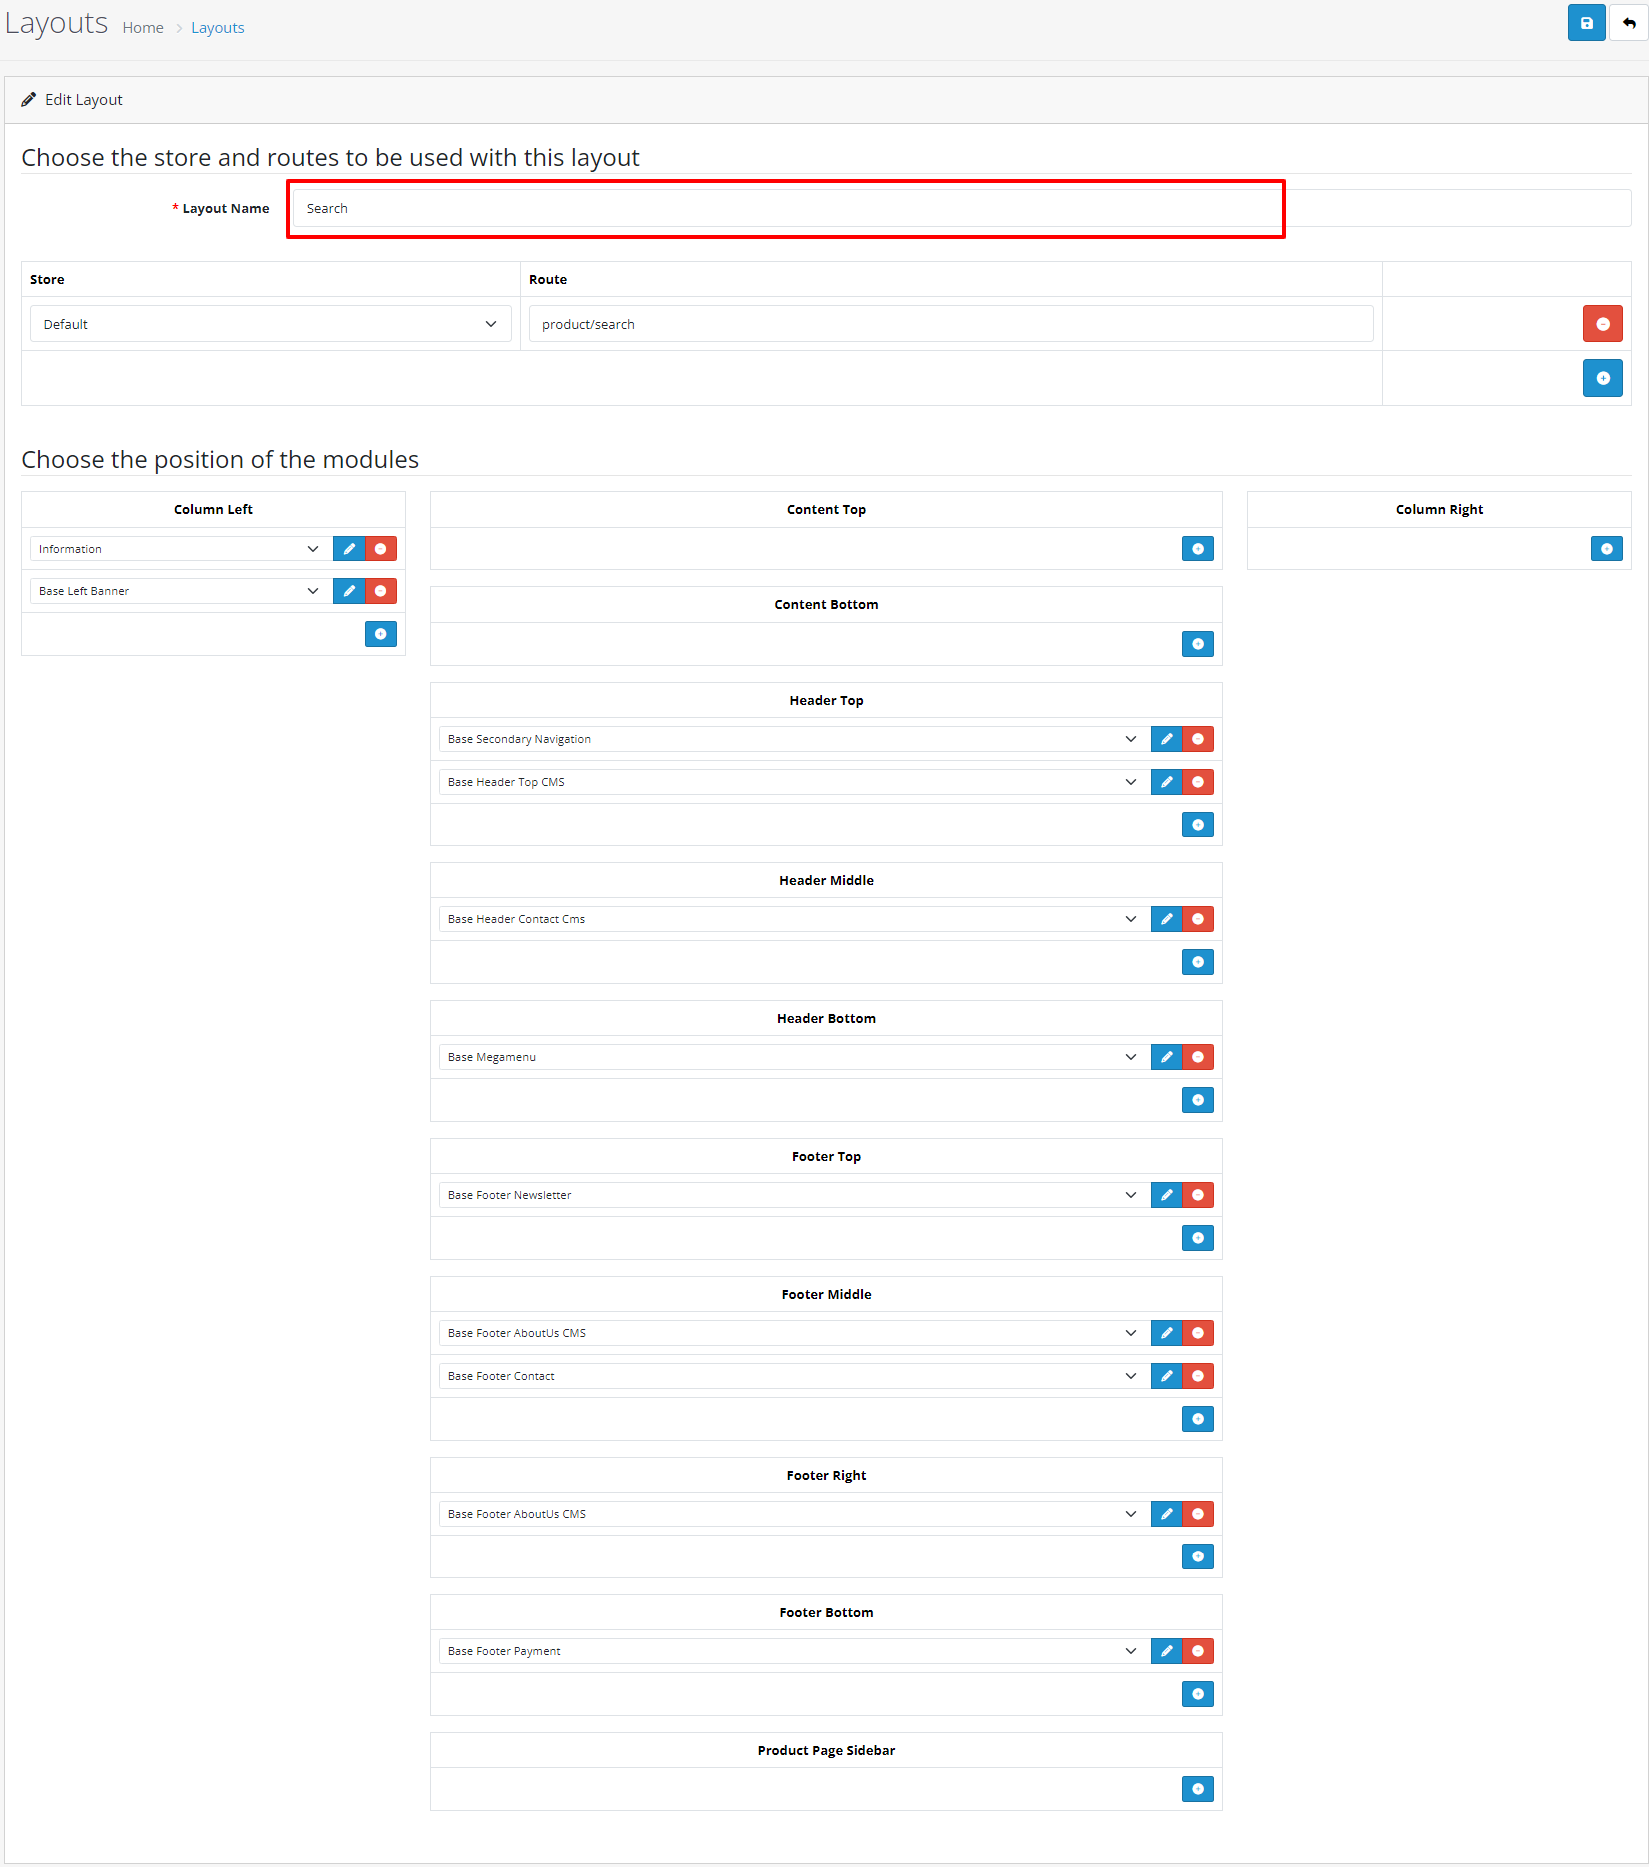
Layout Setting
- For Layout Setting Go to Design > Layouts .
1 : Home
- For Home Layout setting Click on Home layout Edit link, and set below settings.

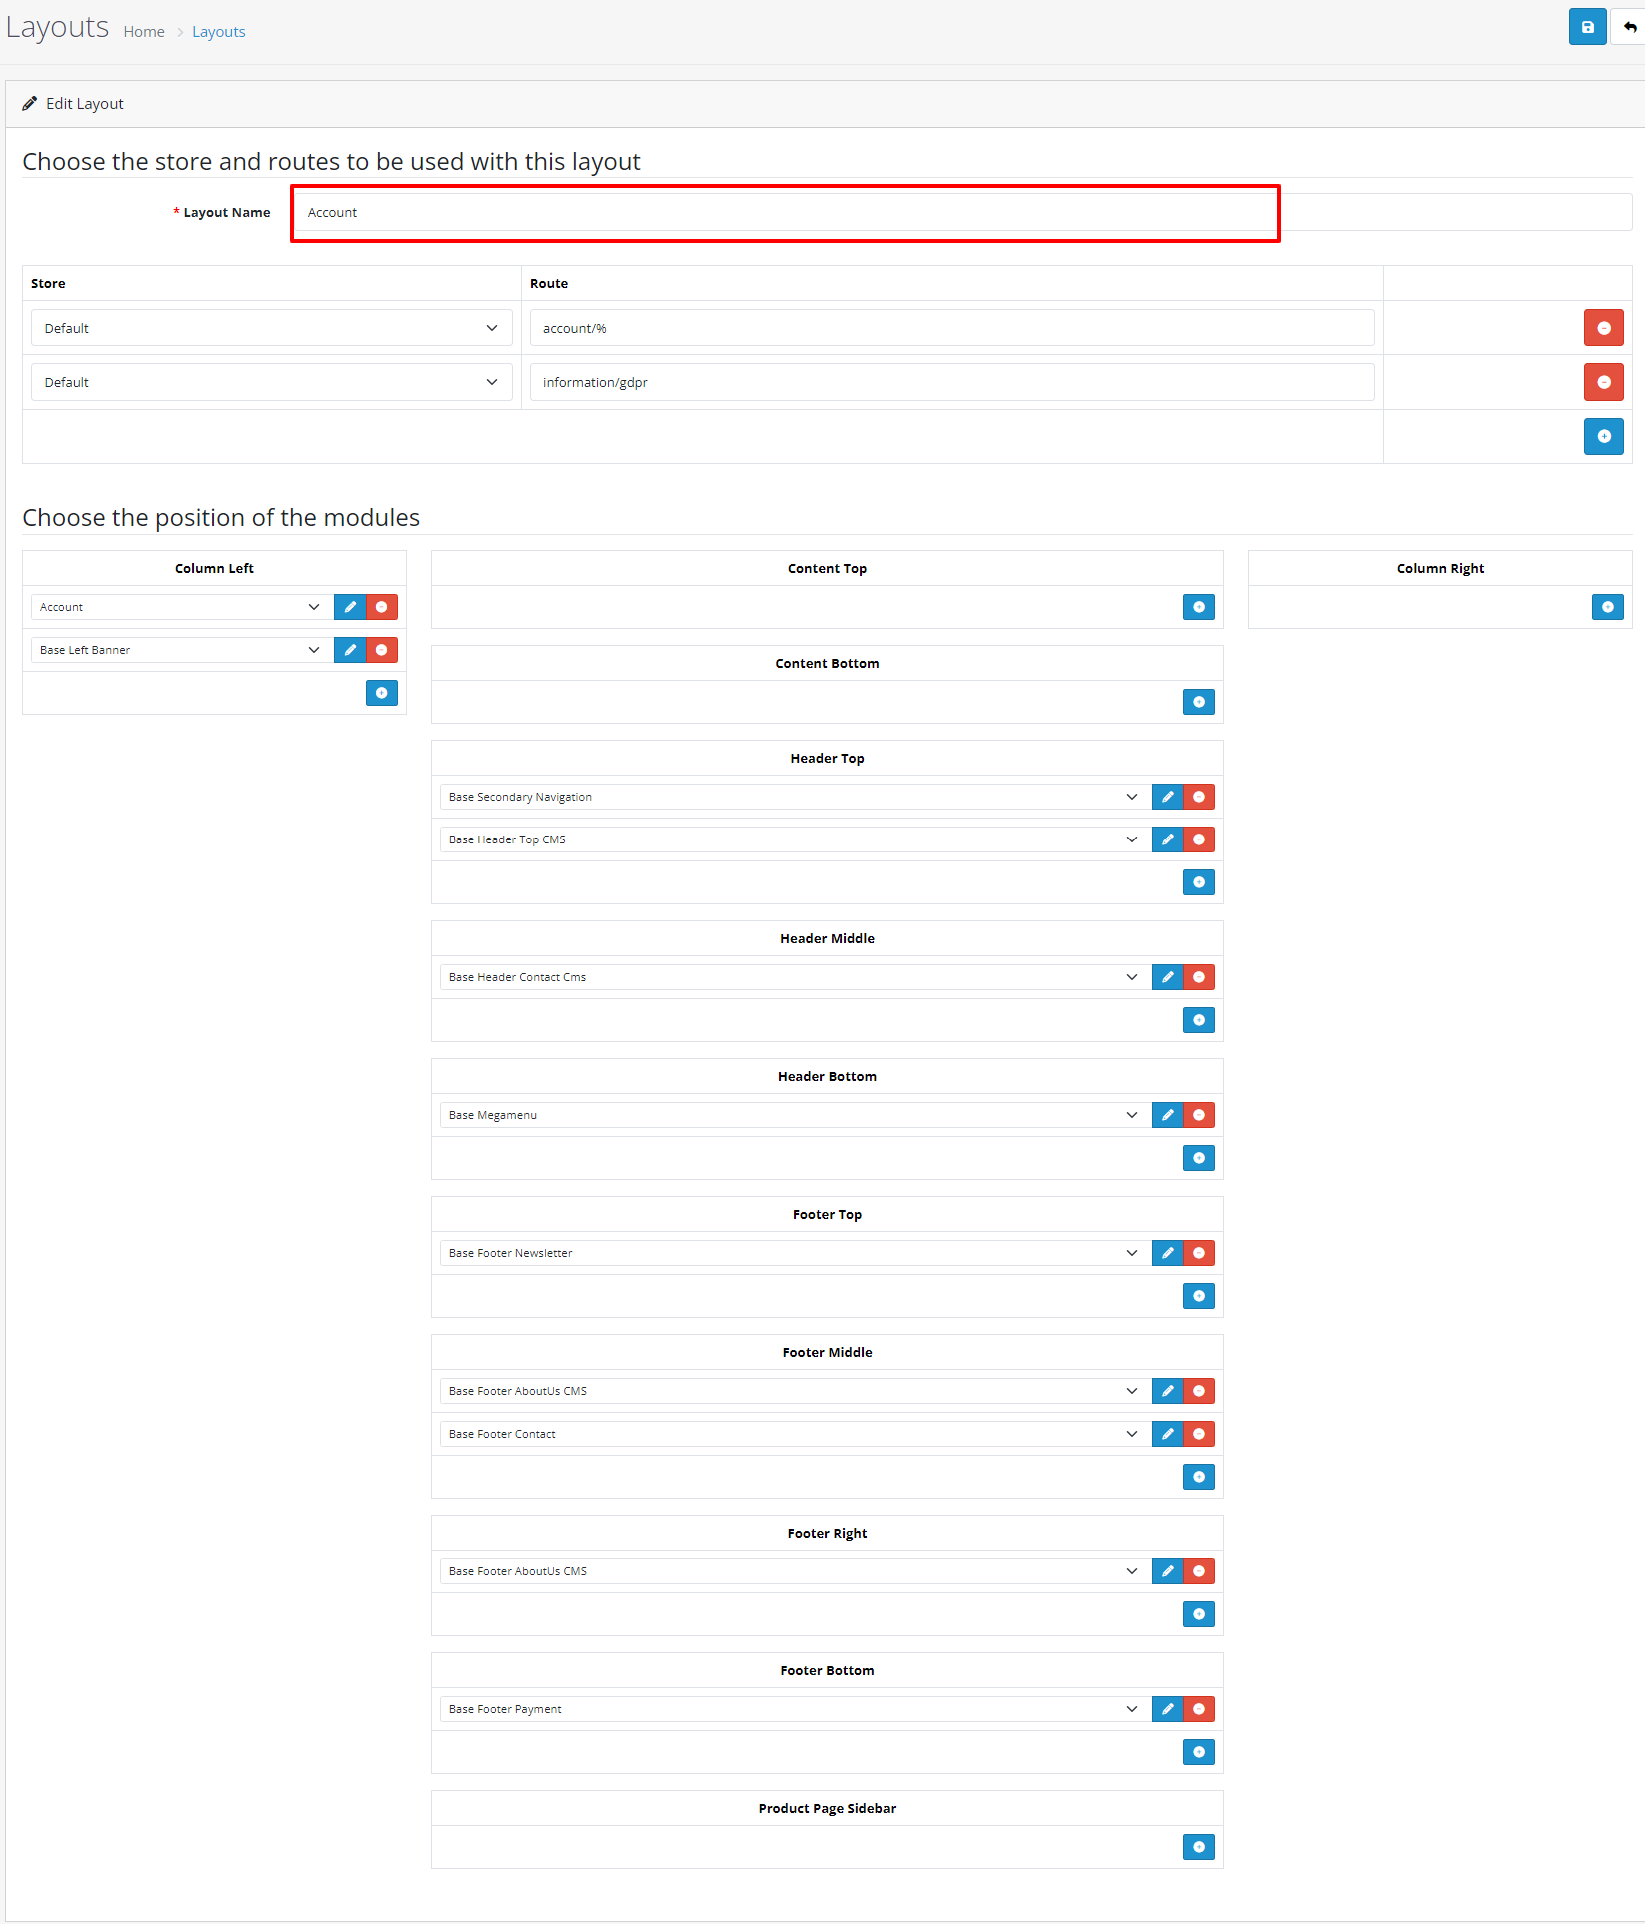
2 : Account
- For Account Layout setting Click on Home layout Edit link, and set below settings.
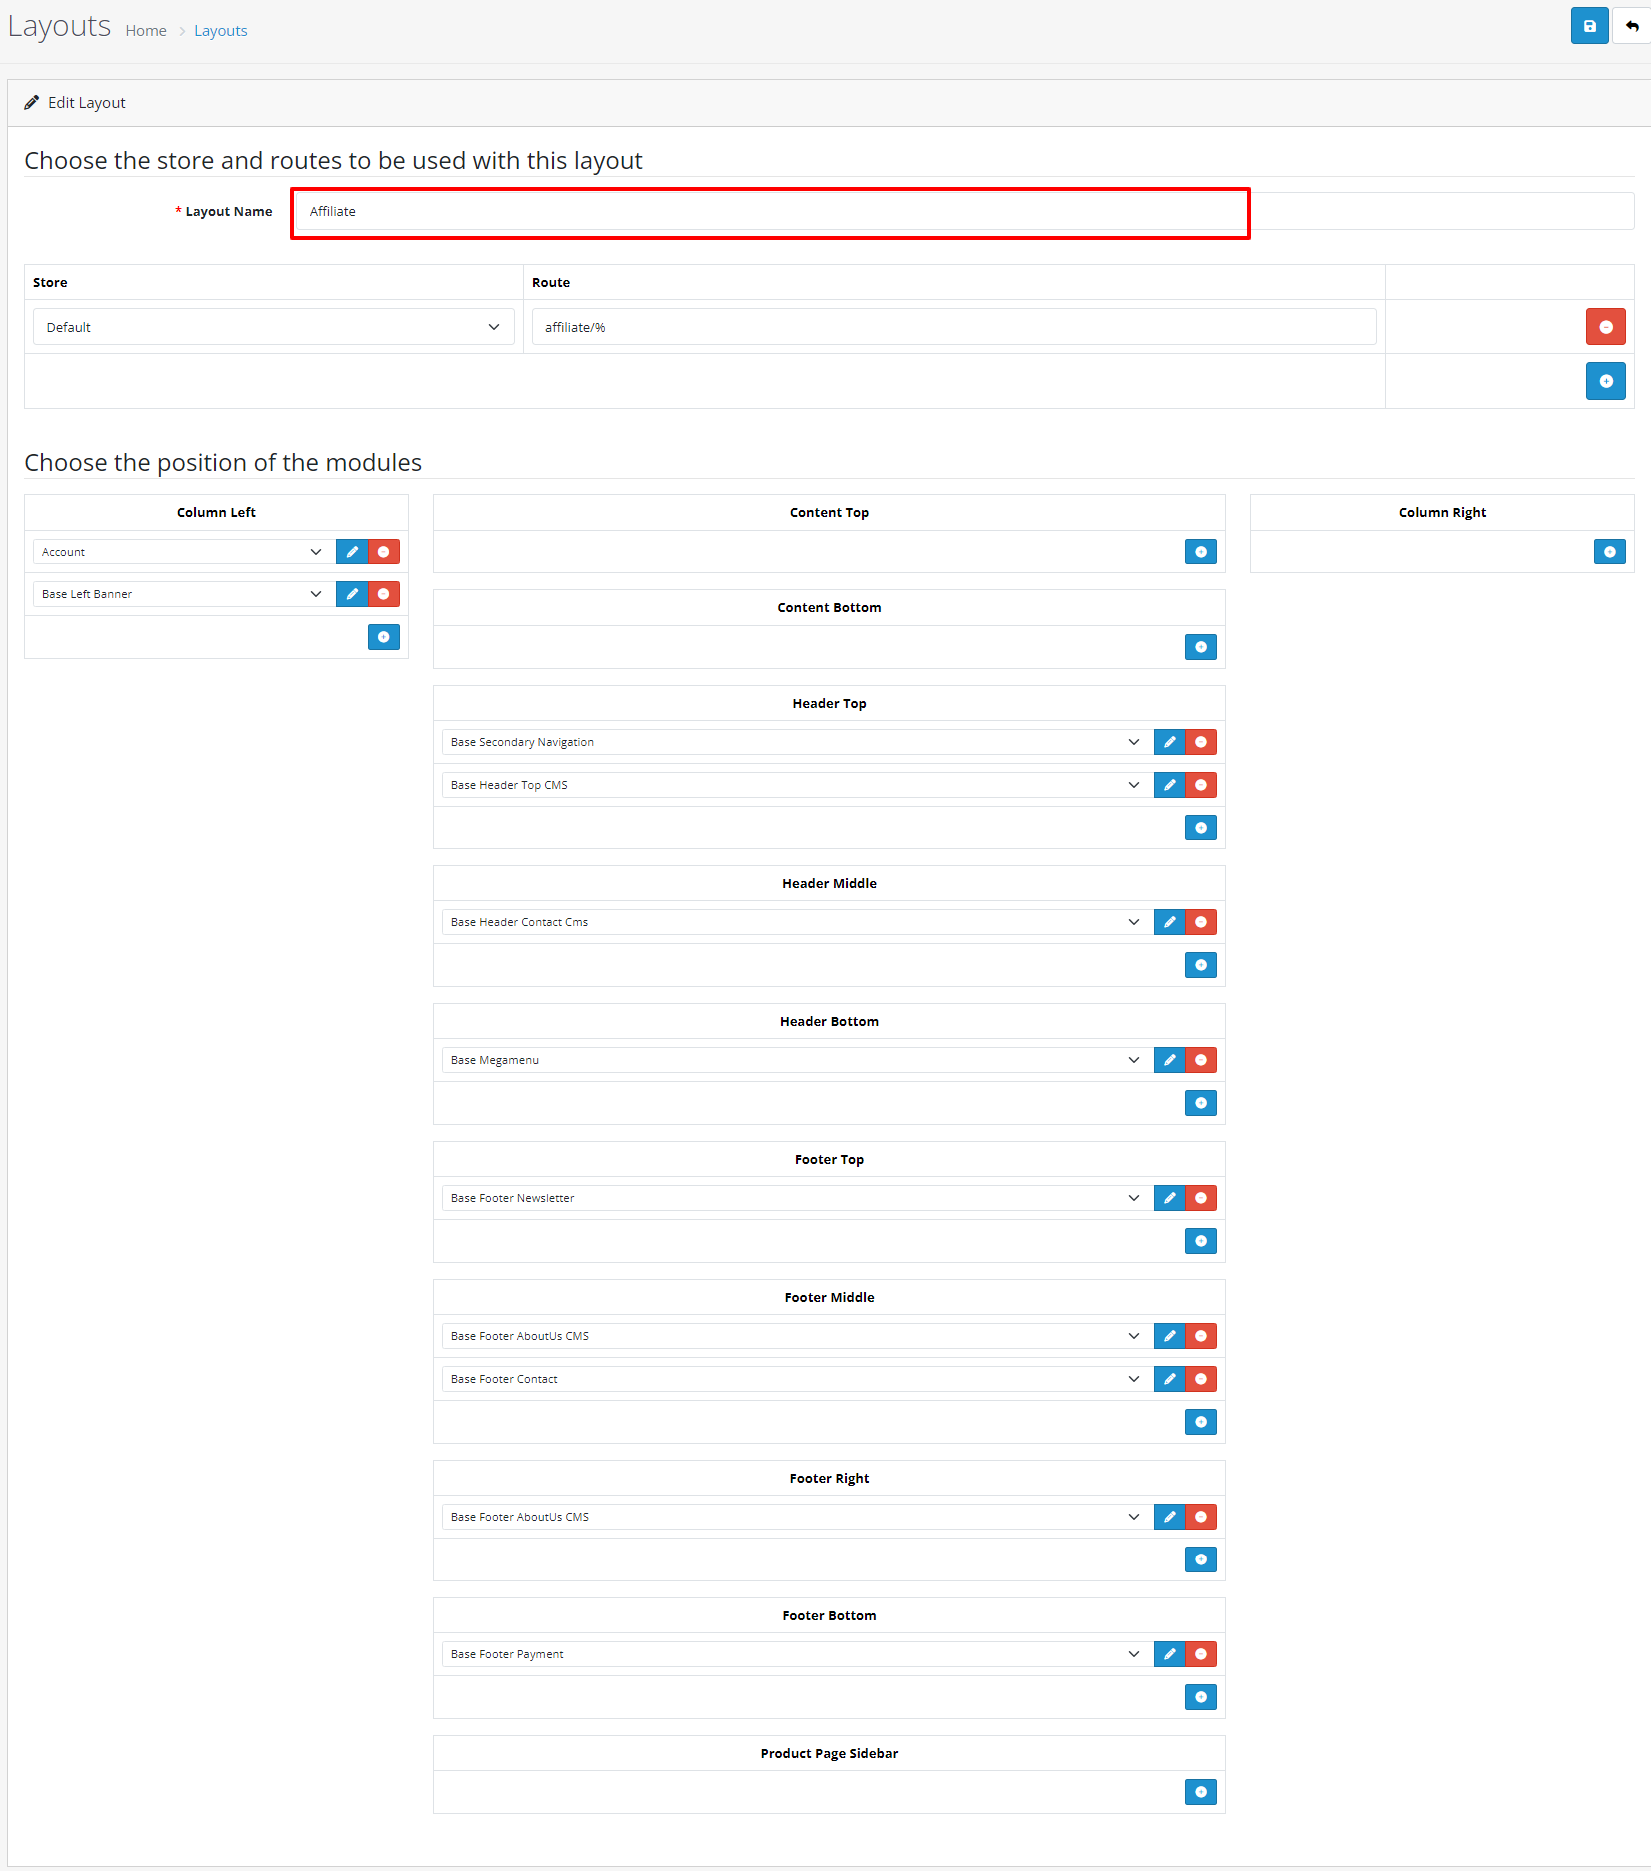
3 : Affiliate
- For Affiliate Layout setting Click on Home layout Edit link, and set below settings.
4 : Category
- For Category Layout setting Click on Home layout Edit link, and set below settings.

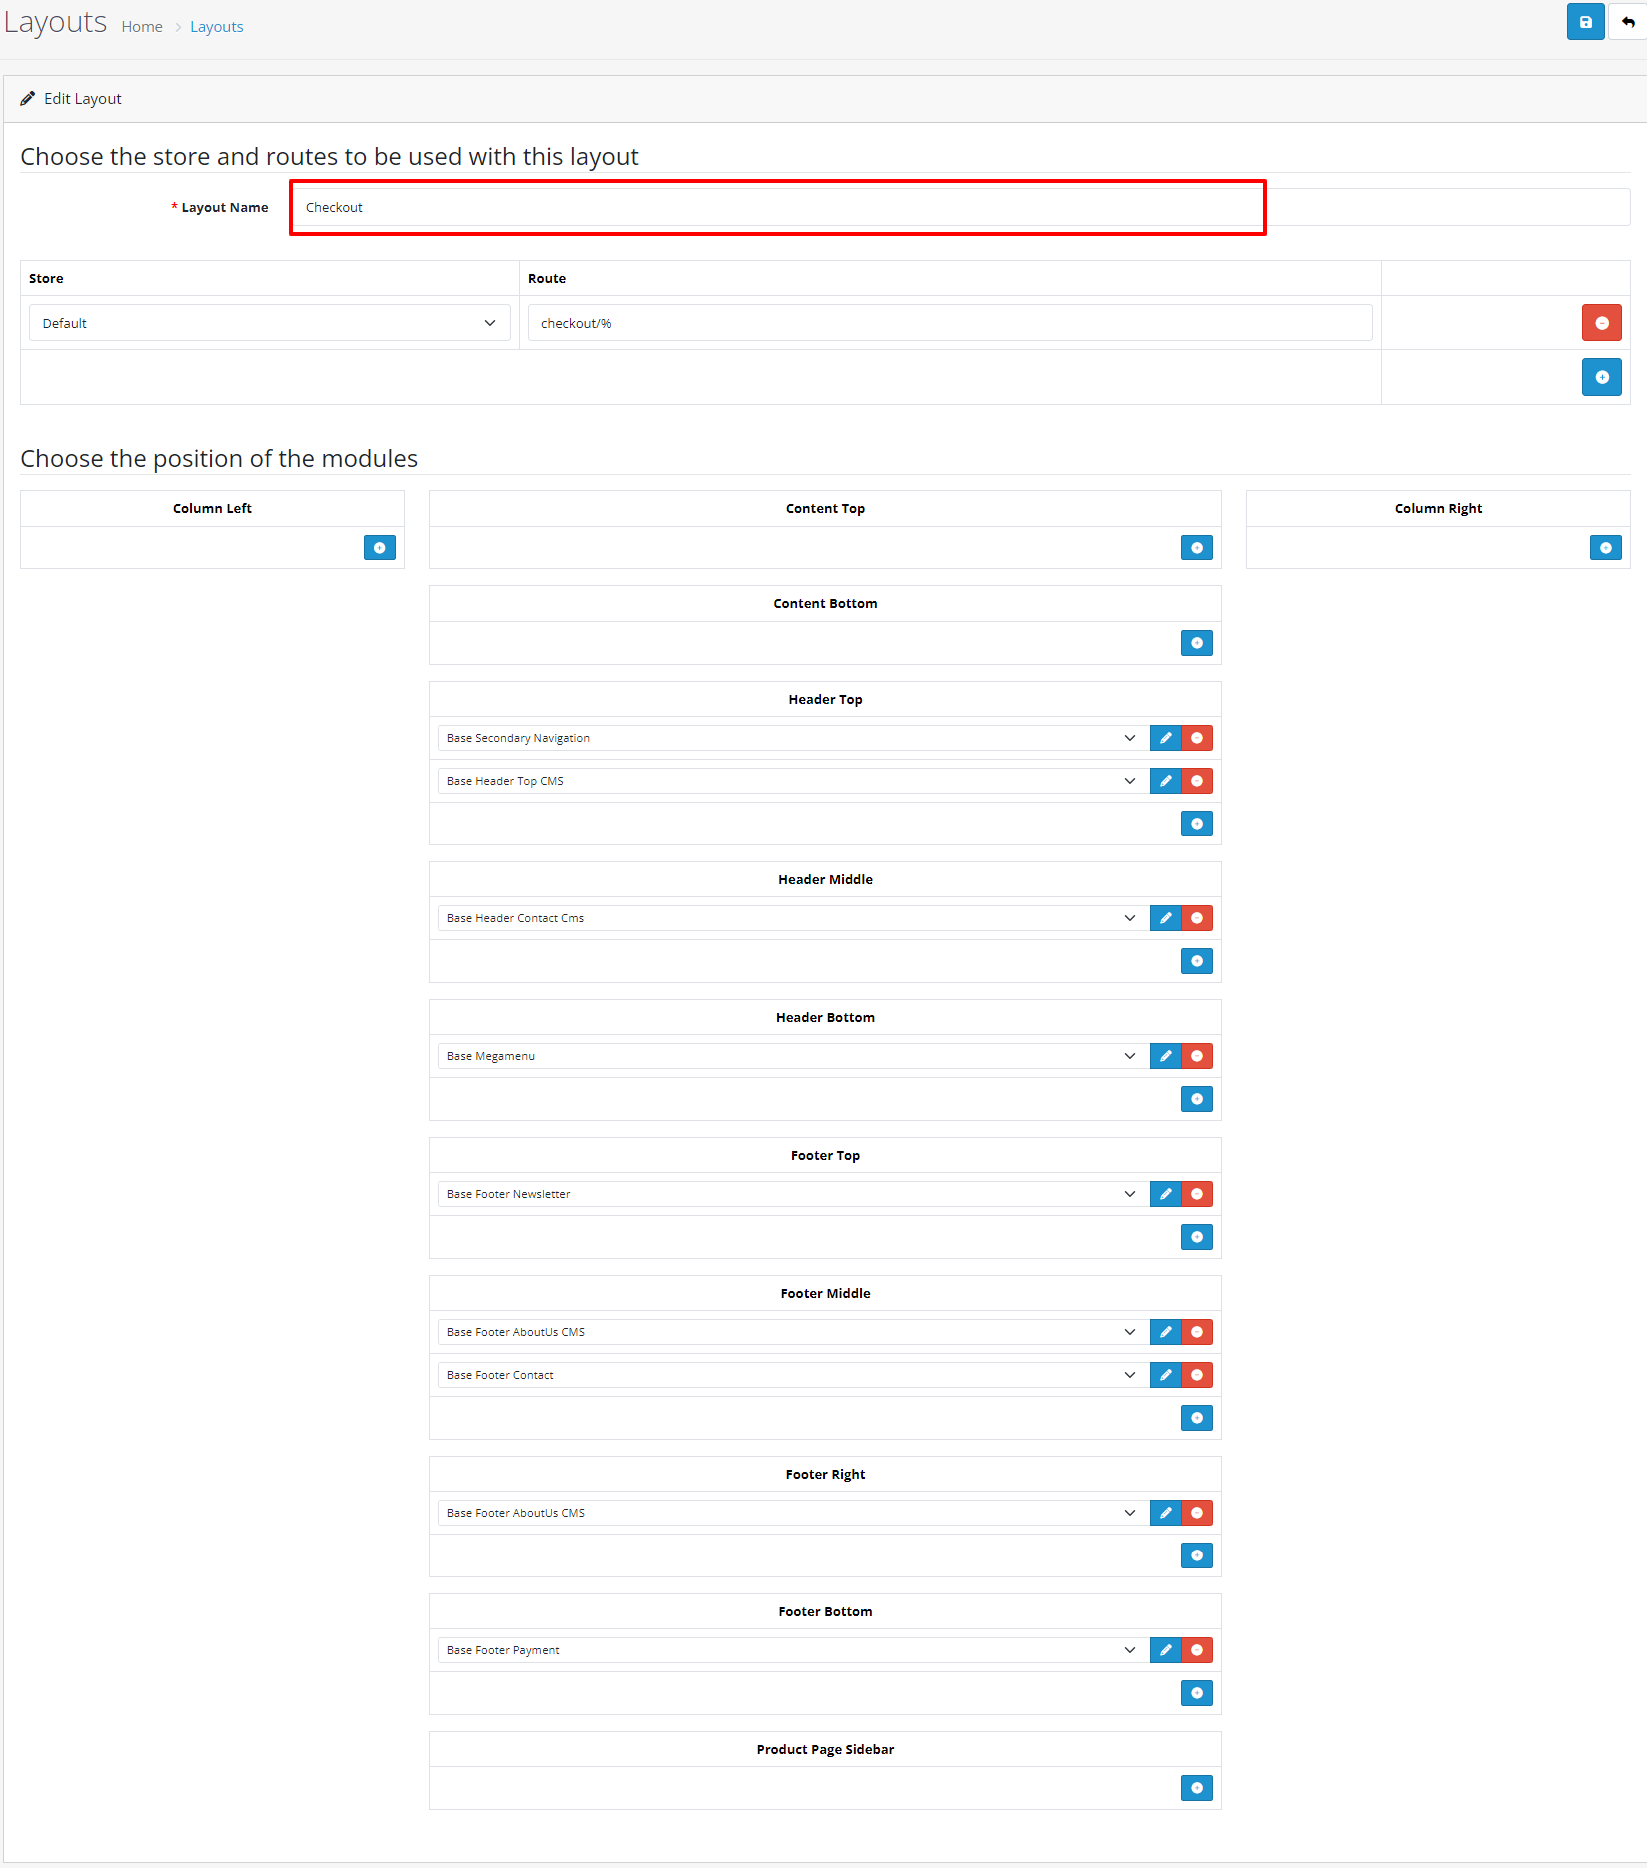
5 : Checkout
- For Checkout Layout setting Click on Home layout Edit link, and set below settings.
6 : Compare
- For Compare Layout setting Click on Home layout Edit link, and set below settings.

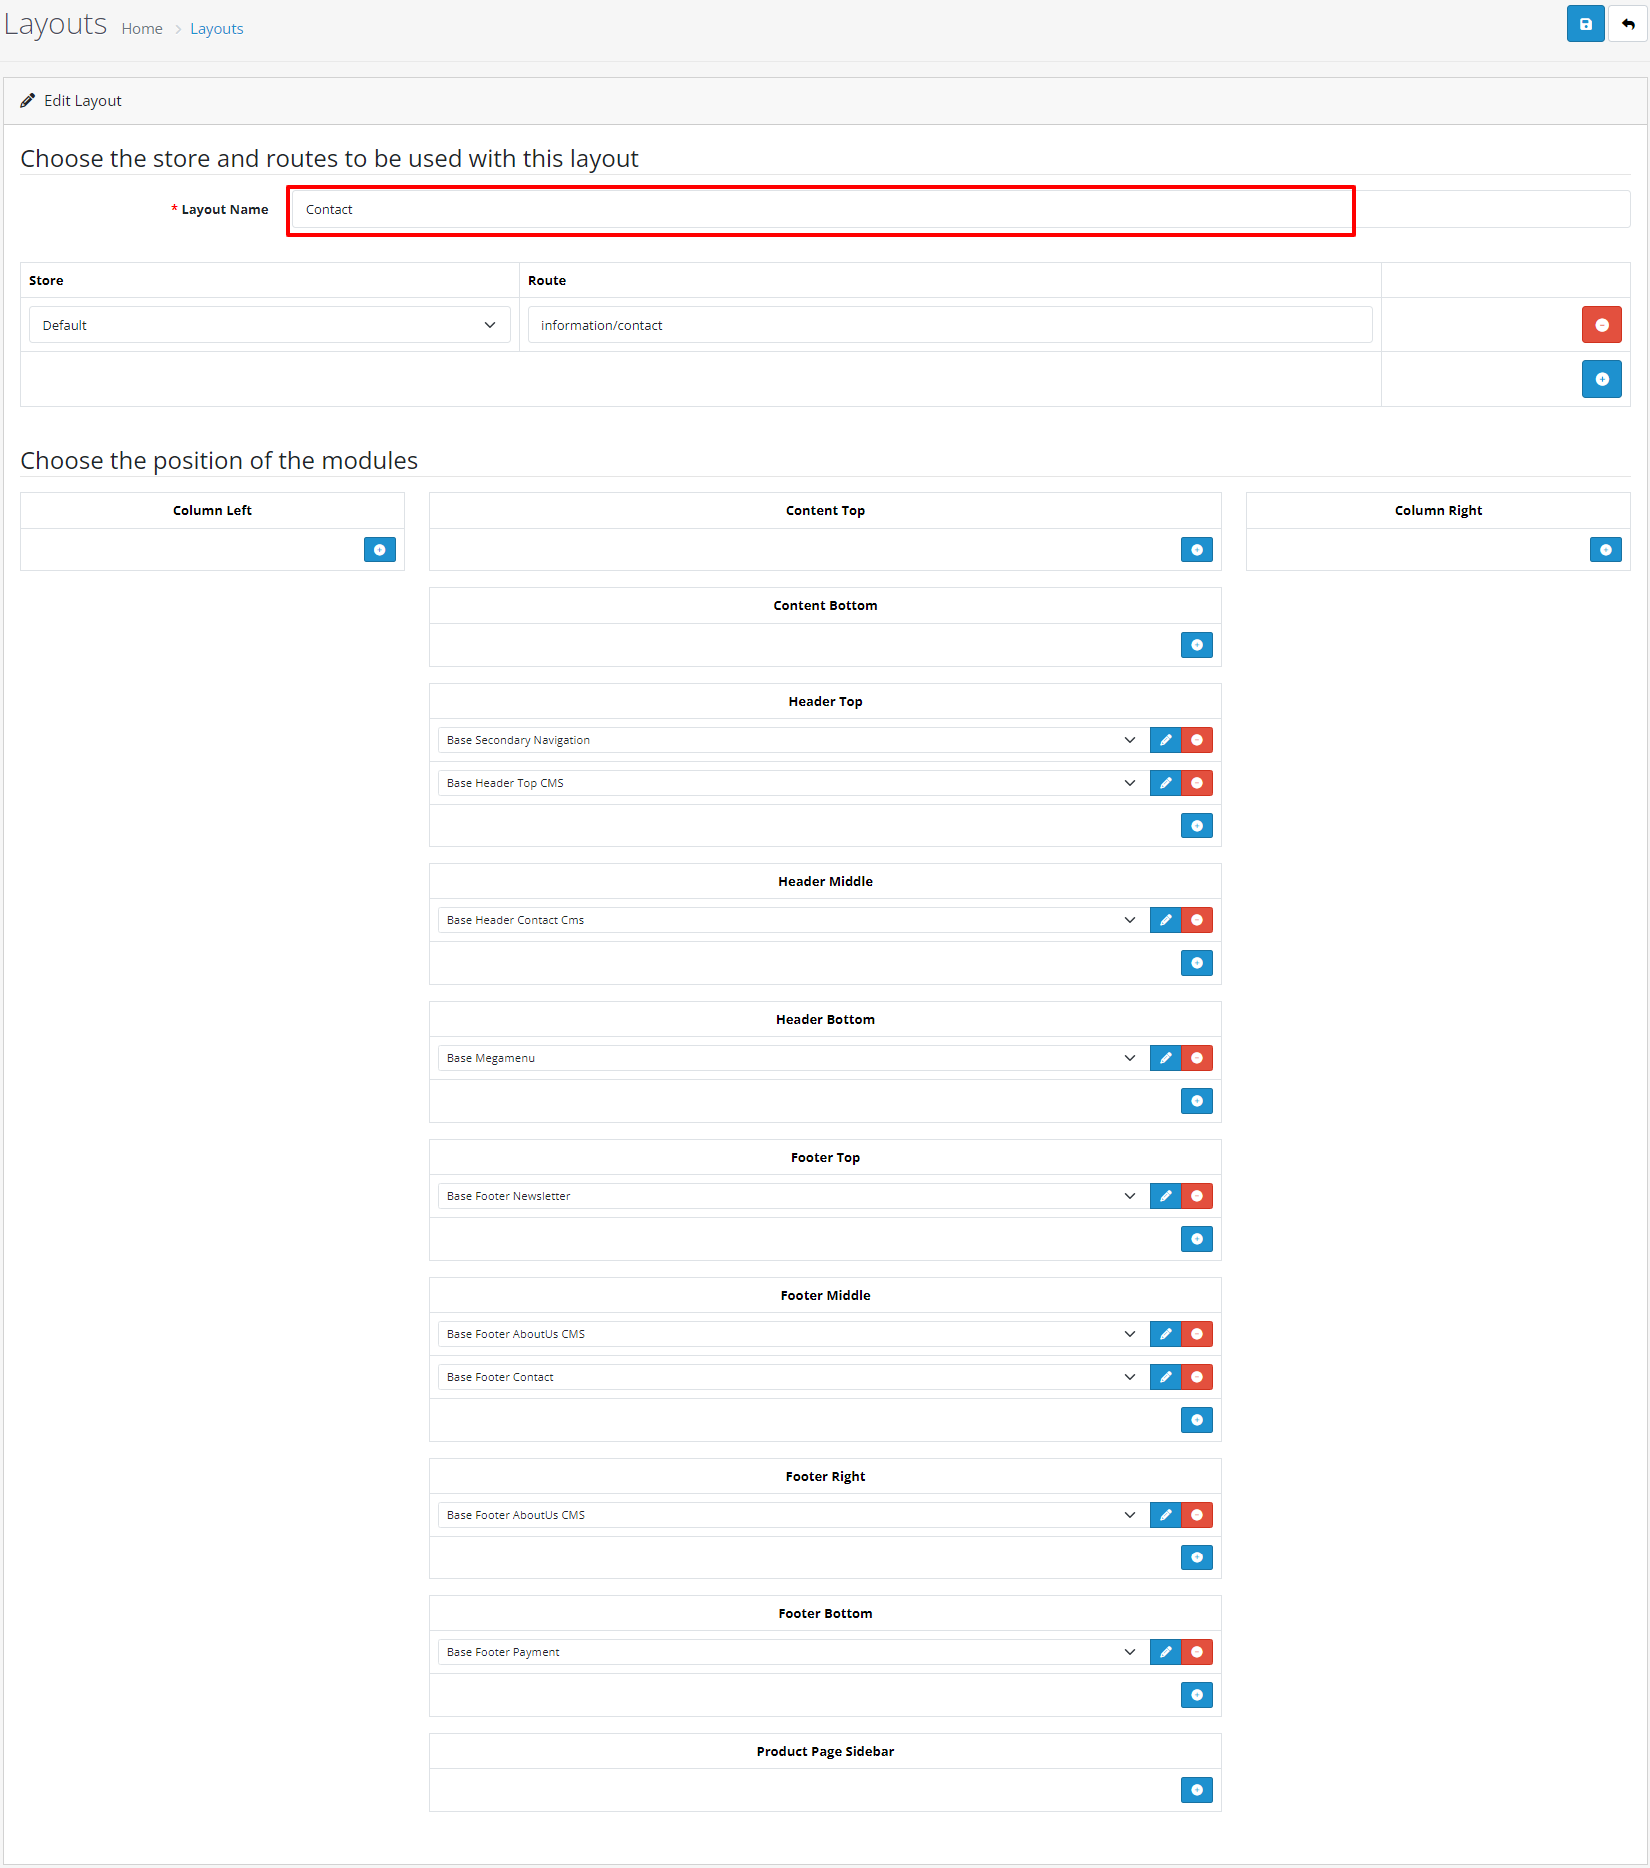
7 : Contact
- For Contact Layout setting Click on Home layout Edit link, and set below settings.
8 : Default
- For Default Layout setting Click on Home layout Edit link, and set below settings.

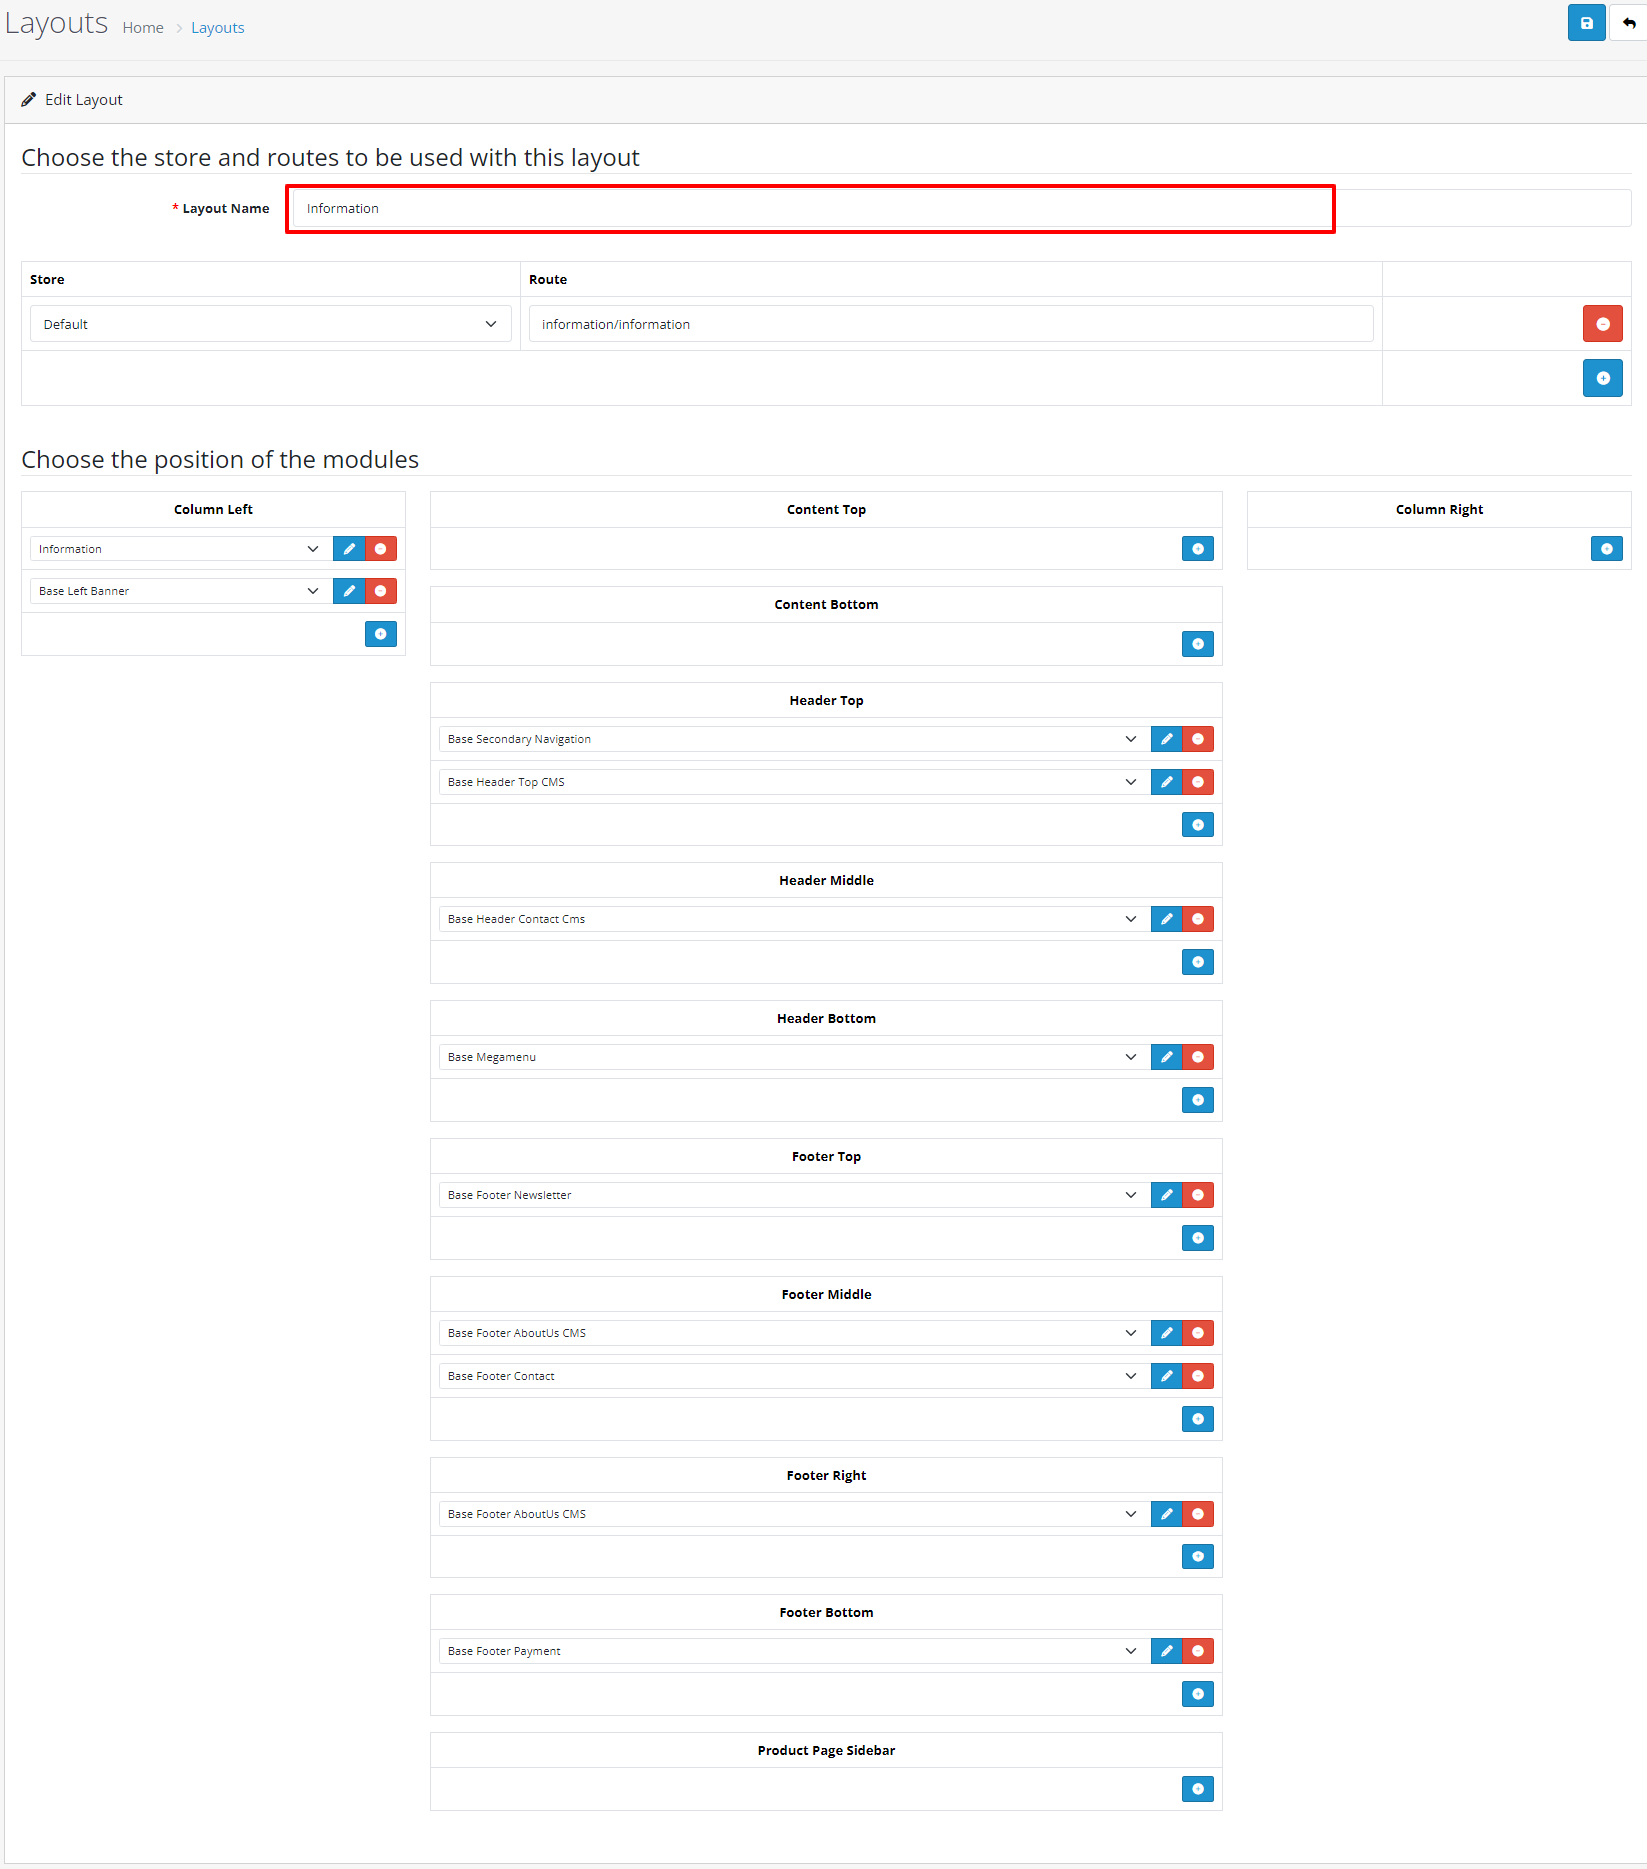
9 : Information
- For Information Layout setting Click on Home layout Edit link, and set below settings.
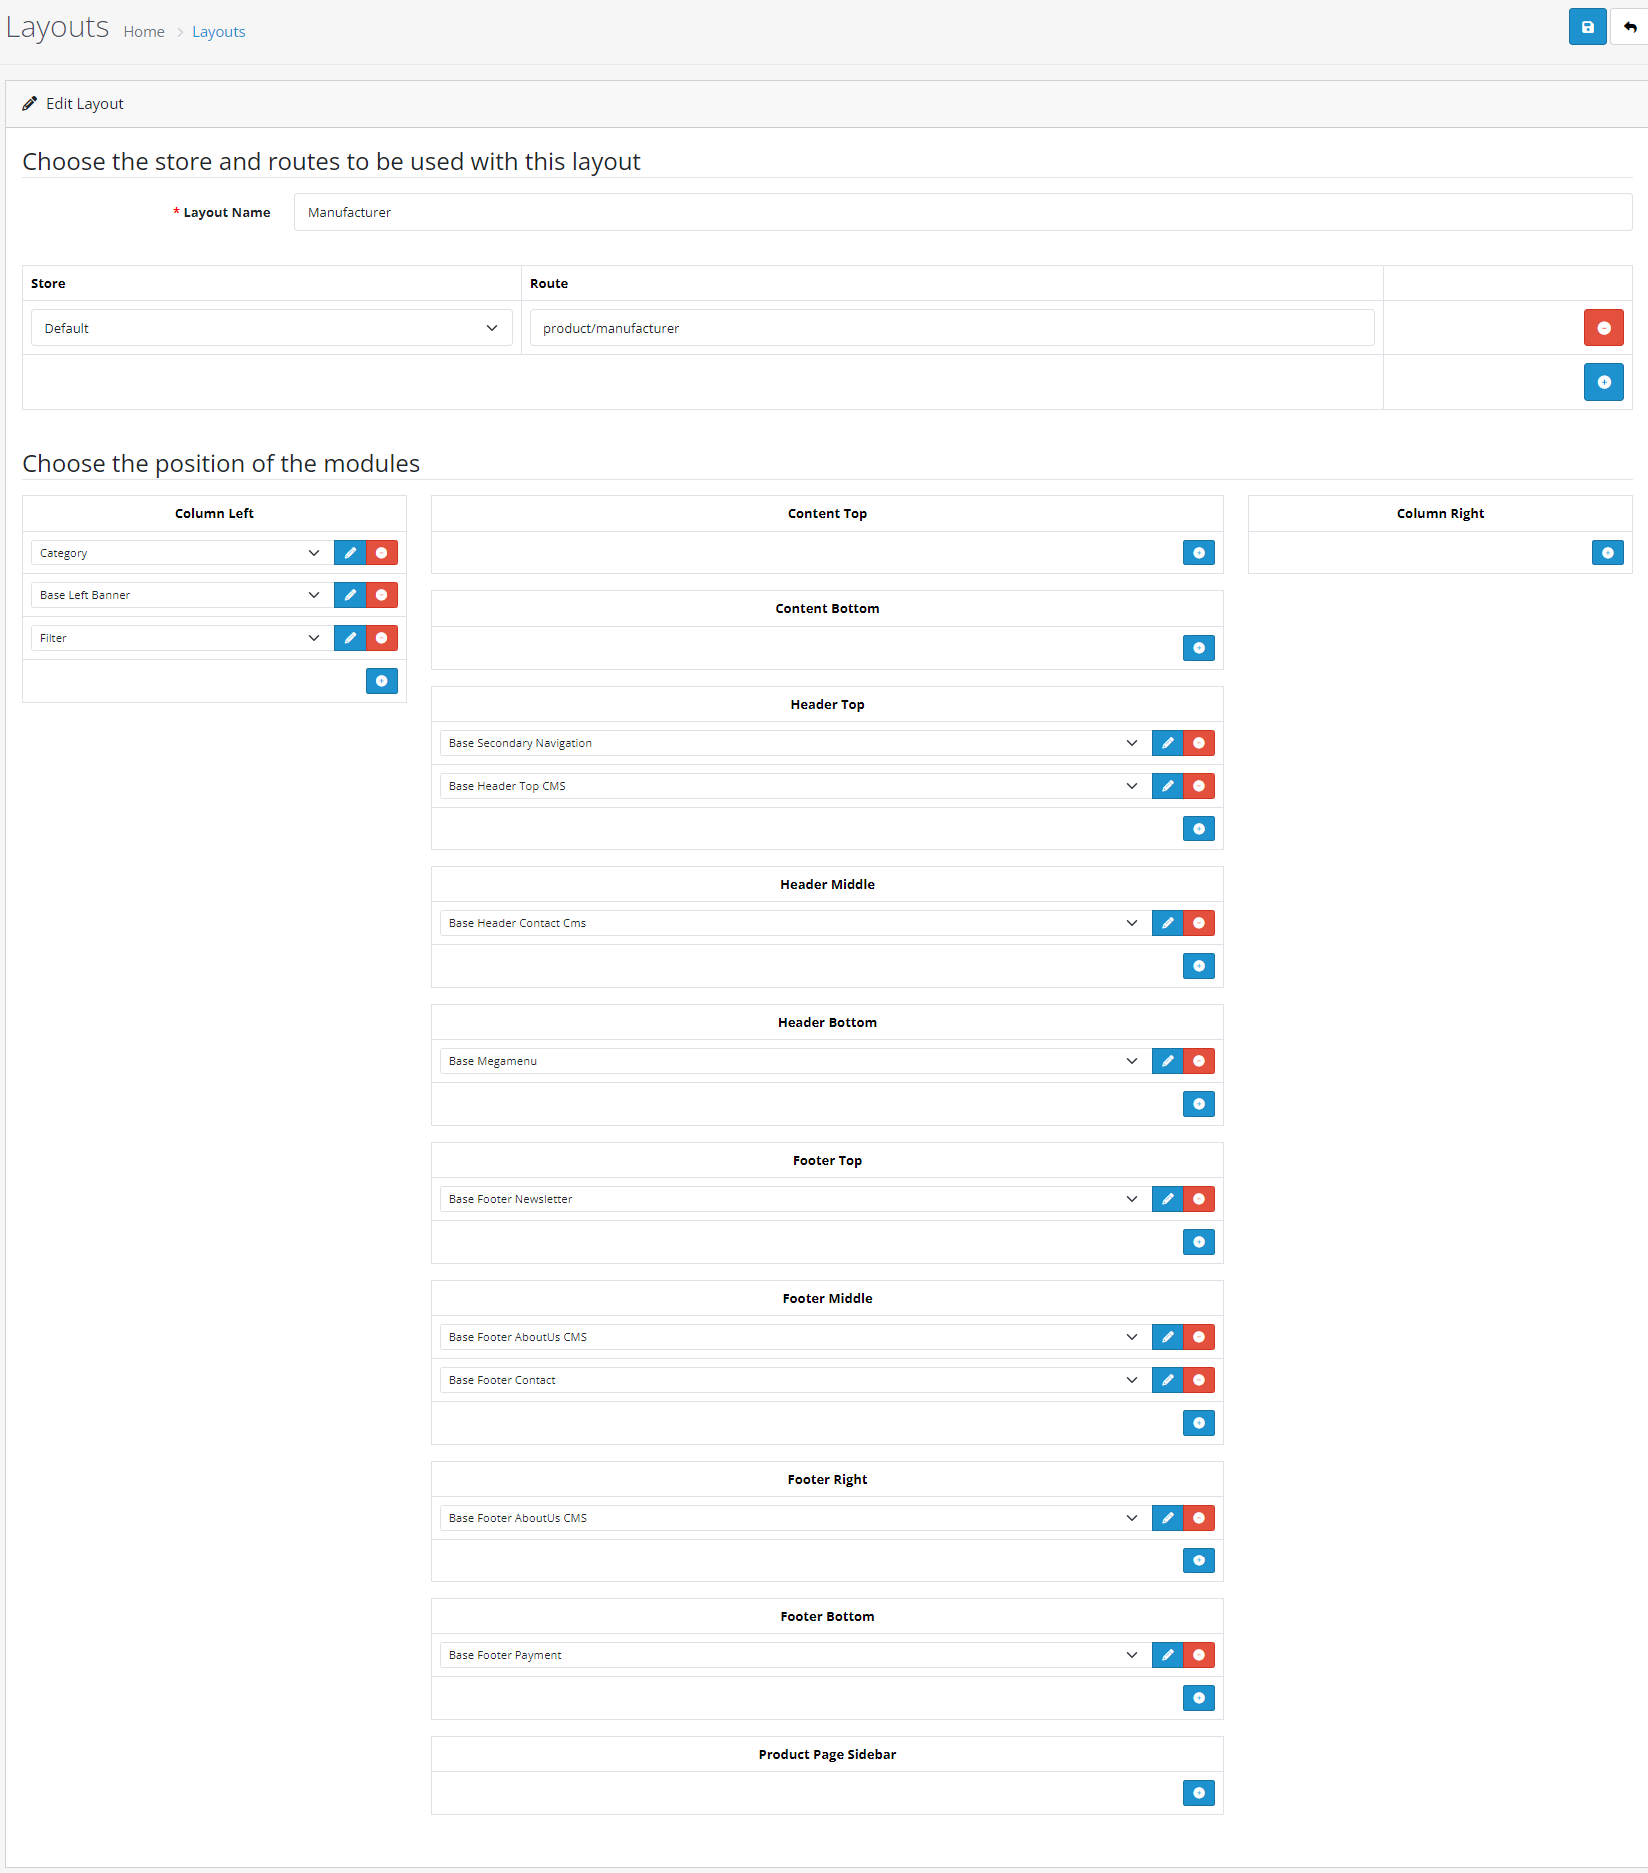
10 : Manufacturer
- For Manufacturer Layout setting Click on Home layout Edit link, and set below settings.
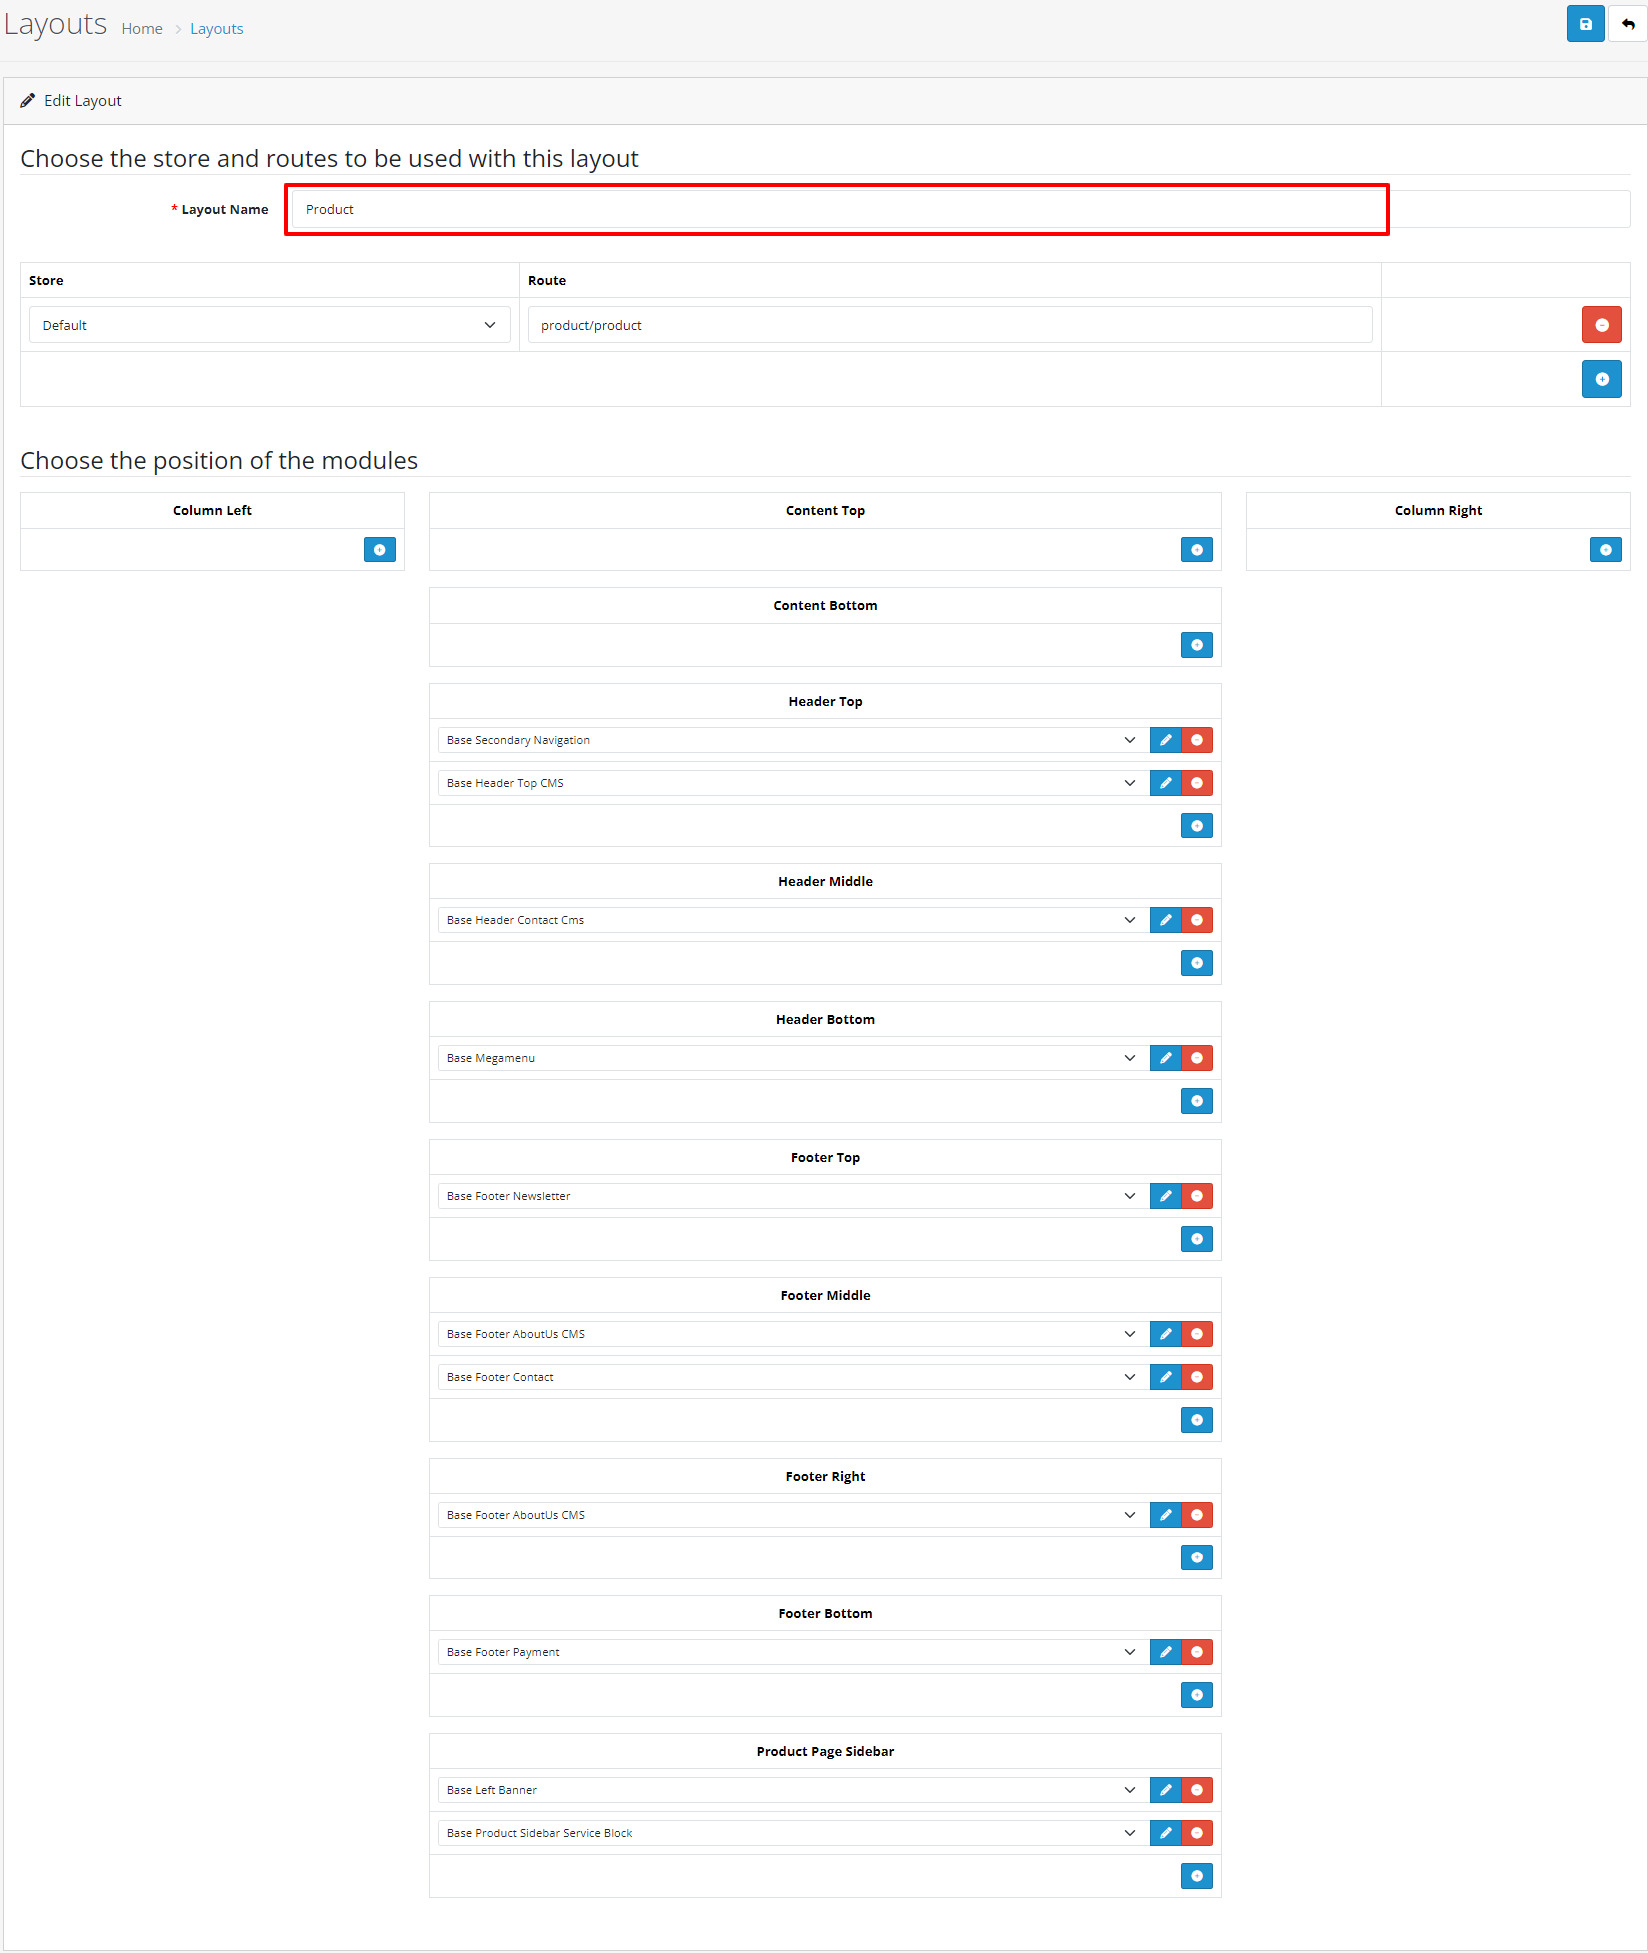
11 : Product
- For Product Layout setting Click on Home layout Edit link, and set below settings.
12 : Search
- For Search Layout setting Click on Home layout Edit link, and set below settings.
13 : Sitemap
- For Sitemap Layout setting Click on Home layout Edit link, and set below settings.
